mirror of
https://github.com/Mr-xn/Penetration_Testing_POC.git
synced 2026-10-24 17:04:31 +00:00
1171 lines
44 KiB
Markdown
1171 lines
44 KiB
Markdown

|
# 基础篇 - Hessian 协议详解
|
|||
|
|
> 2024-11-13
|
|||
|
|
> 来源:https://changeyourway.github.io/2024/11/13/Java%20%E5%AE%89%E5%85%A8/%E5%9F%BA%E7%A1%80%E7%AF%87-Hessian%E5%8D%8F%E8%AE%AE%E8%AF%A6%E8%A7%A3/
|
|||
|
|
|
|||
|
|
## Hessian 协议介绍
|
|||
|
|
|
|||
|
|
Hessian 协议是一种高效、跨语言的二进制 RPC(Remote Procedure Call,远程过程调用)协议,由 Caucho 公司设计,最早应用于 Java 和 Java 之间的远程调用。其主要特点是使用紧凑的二进制格式传输数据,提供高性能的序列化和反序列化操作,因此适合在网络带宽较低或数据传输效率要求较高的场景中使用。
|
|||
|
|
|
|||
|
|
###### Hessian 协议的特点
|
|||
|
|
|
|||
|
|
1. **跨语言支持**:Hessian 协议设计为跨平台的,支持多种语言,如 Java、Python、C#、PHP 等。不同语言的系统可以通过 Hessian 协议实现远程调用,达到语言无关的通信目的。
|
|||
|
|
2. **高效的二进制序列化**:与 XML 或 JSON 相比,Hessian 采用二进制格式,不仅能减少数据体积,还能降低解析的开销,从而提升性能。Hessian 使用较少的字节来表示复杂的数据结构,尤其适合需要频繁远程调用的分布式系统。
|
|||
|
|
3. **轻量化**:Hessian 协议比传统的 SOAP 和 XML-RPC 更轻量,不依赖任何外部配置文件,序列化和反序列化开销低,适合在资源有限的环境中使用。
|
|||
|
|
4. **良好的兼容性和扩展性**:Hessian 协议设计得非常简单,易于实现,并且可以在不同版本间保持兼容。协议还允许扩展,因此可以添加新类型的数据或特性,而不破坏现有的协议实现。
|
|||
|
|
|
|||
|
|
###### Hessian 协议的工作流程
|
|||
|
|
|
|||
|
|
1. **接口定义**:Hessian 协议一般通过接口来定义服务。服务端实现接口的具体方法,客户端通过代理对象来调用接口的方法,客户端和服务端可以使用相同的接口定义。
|
|||
|
|
2. **数据编码和传输**:客户端将方法调用和参数编码为二进制流,并通过 HTTP 等协议传输给服务端。服务端接收到数据后,进行解码,然后根据接口调用对应的方法。
|
|||
|
|
3. **结果返回**:服务端将方法的返回值编码为二进制流,传回客户端,客户端解码后得到返回结果。
|
|||
|
|
|
|||
|
|
###### Hessian 协议的数据类型
|
|||
|
|
|
|||
|
|
Hessian 协议支持多种基本数据类型和复杂数据类型,包括:
|
|||
|
|
|
|||
|
|
- 基本类型:`int`、`long`、`boolean`、`double`等。
|
|||
|
|
- 字符串和二进制数据:字符串以 UTF-8 格式编码,二进制数据可以用于传输字节流。
|
|||
|
|
- 集合和数组:支持 List、Map、数组等。
|
|||
|
|
- 自定义对象:可以将 Java 对象序列化为二进制流传输,前提是客户端和服务端的类结构一致。
|
|||
|
|
|
|||
|
|
###### Hessian 协议的优缺点
|
|||
|
|
|
|||
|
|
**优点**:
|
|||
|
|
|
|||
|
|
- **性能高**:由于采用二进制序列化,数据传输速度快,适合高频调用的场景。
|
|||
|
|
- **跨语言性**:支持多种编程语言间的互通,便于异构系统的集成。
|
|||
|
|
- **轻量级**:协议设计简单,序列化和反序列化效率高,占用资源少。
|
|||
|
|
|
|||
|
|
**缺点**:
|
|||
|
|
|
|||
|
|
- **可读性差**:由于采用二进制格式,数据不可读,调试和排查问题可能较困难。
|
|||
|
|
- **生态系统有限**:相较于 gRPC、Thrift 等更广泛的 RPC 框架,Hessian 的支持和使用范围相对较窄。
|
|||
|
|
- **复杂性**:自定义对象的序列化要求客户端和服务端具有一致的类结构,可能导致版本兼容性问题。
|
|||
|
|
|
|||
|
|
###### 使用场景
|
|||
|
|
|
|||
|
|
Hessian 协议适用于以下场景:
|
|||
|
|
|
|||
|
|
- **微服务**:在微服务架构中,通过 Hessian 协议实现服务之间的高效调用。
|
|||
|
|
- **移动和 IoT 设备**:对于网络带宽受限的场景(如移动网络或 IoT设 备),Hessian 能显著减少传输的数据量。
|
|||
|
|
- **高频调用的企业系统**:在需要频繁调用的场景下,Hessian 协议比 JSON 或 XML 序列化更为高效,能提高系统的整体性能。
|
|||
|
|
|
|||
|
|
## Hessian 基本使用
|
|||
|
|
|
|||
|
|
### 基于 Servlet
|
|||
|
|
|
|||
|
|
Hessian 提供了一个类 com.caucho.hessian.server.HessianServlet ,将 Hessian 服务实现暴露为 Servlet 。因此我们可以让一个 Servlet 通过继承 HessianServlet 来提供 hessian 服务。
|
|||
|
|
|
|||
|
|
以下是基于注解的实现步骤,首先需要用 maven 创建一个 web 项目:
|
|||
|
|
|
|||
|
|
###### 添加依赖
|
|||
|
|
|
|||
|
|
在 `pom.xml` 中添加 Hessian 依赖,这里使用目前的最新版本 4.0.66 ,以及 Servlet 依赖,4.0 以前是 javax.servlet 包下:
|
|||
|
|
|
|||
|
|
```
|
|||
|
|
<dependency>
|
|||
|
|
<groupId>com.caucho</groupId>
|
|||
|
|
<artifactId>hessian</artifactId>
|
|||
|
|
<version>4.0.66</version>
|
|||
|
|
</dependency>
|
|||
|
|
<dependency>
|
|||
|
|
<groupId>javax.servlet</groupId>
|
|||
|
|
<artifactId>javax.servlet-api</artifactId>
|
|||
|
|
<version>4.0.1</version>
|
|||
|
|
<scope>provided</scope>
|
|||
|
|
</dependency>
|
|||
|
|
```
|
|||
|
|
|
|||
|
|
###### 定义服务接口
|
|||
|
|
|
|||
|
|
定义一个远程调用接口,例如 `GreetingService`:
|
|||
|
|
|
|||
|
|
```
|
|||
|
|
public interface GreetingService {
|
|||
|
|
String sayHello(String name);
|
|||
|
|
}
|
|||
|
|
```
|
|||
|
|
|
|||
|
|
###### 实现服务接口
|
|||
|
|
|
|||
|
|
创建接口的实现类,例如 `GreetingServiceImpl`:
|
|||
|
|
|
|||
|
|
```
|
|||
|
|
public class GreetingServiceImpl implements GreetingService {
|
|||
|
|
@Override
|
|||
|
|
public String sayHello(String name) {
|
|||
|
|
return "Hello, " + name + "!";
|
|||
|
|
}
|
|||
|
|
}
|
|||
|
|
```
|
|||
|
|
|
|||
|
|
###### 创建继承 HessianServlet 的 Servlet
|
|||
|
|
|
|||
|
|
使用 `@WebServlet` 注解配置 Servlet,并在 Servlet 中继承 `HessianServlet` 类来实现 Hessian 服务接口:
|
|||
|
|
|
|||
|
|
```
|
|||
|
|
import com.caucho.hessian.server.HessianServlet;
|
|||
|
|
import jakarta.servlet.annotation.WebServlet;
|
|||
|
|
|
|||
|
|
@WebServlet("/greeting")
|
|||
|
|
public class GreetingServiceServlet extends HessianServlet implements GreetingService {
|
|||
|
|
private final GreetingService greetingService = new GreetingServiceImpl();
|
|||
|
|
|
|||
|
|
@Override
|
|||
|
|
public String sayHello(String name) {
|
|||
|
|
return greetingService.sayHello(name);
|
|||
|
|
}
|
|||
|
|
}
|
|||
|
|
```
|
|||
|
|
|
|||
|
|
在这个类中:
|
|||
|
|
|
|||
|
|
- `@WebServlet("/greeting")` 注解将 Servlet 映射到 `/greeting` URL,客户端可以通过该 URL 调用 Hessian 服务。
|
|||
|
|
- `GreetingServiceServlet` 继承了 `HessianServlet` 并实现 `GreetingService` 接口,使得该类既是一个 Servlet,又是一个 Hessian 服务的实现。
|
|||
|
|
|
|||
|
|
###### 编写客户端代码
|
|||
|
|
|
|||
|
|
客户端可以使用 `HessianProxyFactory` 来访问该 Hessian 服务,客户端也需要有一个和服务端一样的 GreetingService 接口:
|
|||
|
|
|
|||
|
|
```
|
|||
|
|
import com.caucho.hessian.client.HessianProxyFactory;
|
|||
|
|
|
|||
|
|
public class HessianClient {
|
|||
|
|
public static void main(String[] args) {
|
|||
|
|
String url = "http://localhost:8080/ServletBase_war/greeting"; // 替换为实际服务地址
|
|||
|
|
HessianProxyFactory factory = new HessianProxyFactory();
|
|||
|
|
try {
|
|||
|
|
GreetingService service = (GreetingService) factory.create(GreetingService.class, url);
|
|||
|
|
String result = service.sayHello("World");
|
|||
|
|
System.out.println(result); // 输出: Hello, World!
|
|||
|
|
} catch (Exception e) {
|
|||
|
|
e.printStackTrace();
|
|||
|
|
}
|
|||
|
|
}
|
|||
|
|
}
|
|||
|
|
```
|
|||
|
|
|
|||
|
|
###### 部署和运行
|
|||
|
|
|
|||
|
|
1. 将项目部署到支持 Servlet 的 Web 容器(如 Tomcat)。
|
|||
|
|
2. 启动服务器,确保服务在 `/greeting` 路径上发布。
|
|||
|
|
3. 运行客户端代码,通过 Hessian 协议调用服务端的 `sayHello` 方法,并接收返回结果。
|
|||
|
|
|
|||
|
|

|
|||
|
|
|
|||
|
|
### 整合 Spring
|
|||
|
|
|
|||
|
|
Spring-web 包内提供了 org.springframework.remoting.caucho.HessianServiceExporter 用来暴露远程调用的接口和实现类。使用该类 export 的 Hessian Service 可以被任何 Hessian Client 访问,因为 Spring 中间没有进行任何特殊处理。
|
|||
|
|
|
|||
|
|
使用纯注解方式开发基于 Hessian 的 Spring 项目,以下是具体步骤,首先需要用 maven 创建一个 web 项目:
|
|||
|
|
|
|||
|
|
#### 服务端项目
|
|||
|
|
|
|||
|
|
###### 1\. 添加依赖
|
|||
|
|
|
|||
|
|
在服务端项目的 `pom.xml` 中添加 Spring 和 Hessian 依赖:
|
|||
|
|
|
|||
|
|
```
|
|||
|
|
<!-- Servlet API -->
|
|||
|
|
<dependency>
|
|||
|
|
<groupId>javax.servlet</groupId>
|
|||
|
|
<artifactId>javax.servlet-api</artifactId>
|
|||
|
|
<version>4.0.1</version>
|
|||
|
|
<scope>provided</scope>
|
|||
|
|
</dependency>
|
|||
|
|
|
|||
|
|
<!-- Spring Context -->
|
|||
|
|
<dependency>
|
|||
|
|
<groupId>org.springframework</groupId>
|
|||
|
|
<artifactId>spring-context</artifactId>
|
|||
|
|
<version>5.2.10.RELEASE</version>
|
|||
|
|
</dependency>
|
|||
|
|
|
|||
|
|
<!-- Spring Web -->
|
|||
|
|
<dependency>
|
|||
|
|
<groupId>org.springframework</groupId>
|
|||
|
|
<artifactId>spring-web</artifactId>
|
|||
|
|
<version>5.2.10.RELEASE</version>
|
|||
|
|
</dependency>
|
|||
|
|
|
|||
|
|
<!-- Spring Web MVC -->
|
|||
|
|
<dependency>
|
|||
|
|
<groupId>org.springframework</groupId>
|
|||
|
|
<artifactId>spring-webmvc</artifactId>
|
|||
|
|
<version>5.2.10.RELEASE</version>
|
|||
|
|
</dependency>
|
|||
|
|
|
|||
|
|
<!-- Hessian -->
|
|||
|
|
<dependency>
|
|||
|
|
<groupId>com.caucho</groupId>
|
|||
|
|
<artifactId>hessian</artifactId>
|
|||
|
|
<version>4.0.66</version>
|
|||
|
|
</dependency>
|
|||
|
|
```
|
|||
|
|
|
|||
|
|
###### 2\. 定义服务接口
|
|||
|
|
|
|||
|
|
创建一个服务接口 `HelloService`,用于定义客户端和服务端共用的接口:
|
|||
|
|
|
|||
|
|
```
|
|||
|
|
public interface HelloService {
|
|||
|
|
String sayHello(String name);
|
|||
|
|
}
|
|||
|
|
```
|
|||
|
|
|
|||
|
|
###### 3\. 实现服务接口
|
|||
|
|
|
|||
|
|
在服务端项目中,创建 `HelloServiceImpl` 实现接口:
|
|||
|
|
|
|||
|
|
```
|
|||
|
|
import org.springframework.stereotype.Service;
|
|||
|
|
|
|||
|
|
@Service
|
|||
|
|
public class HelloServiceImpl implements HelloService {
|
|||
|
|
@Override
|
|||
|
|
public String sayHello(String name) {
|
|||
|
|
return "Hello, " + name;
|
|||
|
|
}
|
|||
|
|
}
|
|||
|
|
```
|
|||
|
|
|
|||
|
|
###### 4\. 创建 Spring 配置类
|
|||
|
|
|
|||
|
|
创建 `HessianServerConfig` 配置类,用于将 `HelloService` 暴露为 Hessian 服务:
|
|||
|
|
|
|||
|
|
```
|
|||
|
|
import org.springframework.context.annotation.Bean;
|
|||
|
|
import org.springframework.context.annotation.ComponentScan;
|
|||
|
|
import org.springframework.context.annotation.Configuration;
|
|||
|
|
import org.springframework.remoting.caucho.HessianServiceExporter;
|
|||
|
|
|
|||
|
|
@Configuration
|
|||
|
|
@ComponentScan(basePackages = "com.example") // 使用实际包名
|
|||
|
|
public class HessianServerConfig {
|
|||
|
|
|
|||
|
|
private final HelloService helloService;
|
|||
|
|
|
|||
|
|
public HessianServerConfig(HelloService helloService) {
|
|||
|
|
this.helloService = helloService;
|
|||
|
|
}
|
|||
|
|
|
|||
|
|
@Bean(name = "/helloService")
|
|||
|
|
public HessianServiceExporter hessianServiceExporter() {
|
|||
|
|
HessianServiceExporter exporter = new HessianServiceExporter();
|
|||
|
|
exporter.setService(helloService);
|
|||
|
|
exporter.setServiceInterface(HelloService.class);
|
|||
|
|
return exporter;
|
|||
|
|
}
|
|||
|
|
}
|
|||
|
|
```
|
|||
|
|
|
|||
|
|
###### 5\. 配置 Web 启动类
|
|||
|
|
|
|||
|
|
使用 `WebApplicationInitializer` 配置 `DispatcherServlet` 并加载 Spring 配置类:
|
|||
|
|
|
|||
|
|
```
|
|||
|
|
import org.springframework.web.context.support.AnnotationConfigWebApplicationContext;
|
|||
|
|
import org.springframework.web.servlet.DispatcherServlet;
|
|||
|
|
|
|||
|
|
import javax.servlet.ServletContext;
|
|||
|
|
import javax.servlet.ServletException;
|
|||
|
|
import javax.servlet.ServletRegistration;
|
|||
|
|
import org.springframework.web.WebApplicationInitializer;
|
|||
|
|
|
|||
|
|
public class HessianServerInitializer implements WebApplicationInitializer {
|
|||
|
|
|
|||
|
|
@Override
|
|||
|
|
public void onStartup(ServletContext servletContext) throws ServletException {
|
|||
|
|
// 初始化 Spring Web 上下文
|
|||
|
|
AnnotationConfigWebApplicationContext context = new AnnotationConfigWebApplicationContext();
|
|||
|
|
context.register(HessianServerConfig.class);
|
|||
|
|
|
|||
|
|
// 注册 DispatcherServlet
|
|||
|
|
ServletRegistration.Dynamic dispatcher = servletContext.addServlet("dispatcher", new DispatcherServlet(context));
|
|||
|
|
dispatcher.setLoadOnStartup(1);
|
|||
|
|
dispatcher.addMapping("/");
|
|||
|
|
}
|
|||
|
|
}
|
|||
|
|
```
|
|||
|
|
|
|||
|
|
###### 6\. 部署服务端项目
|
|||
|
|
|
|||
|
|
将服务端项目打包并部署到外部的 Tomcat 或其他 Servlet 容器中。
|
|||
|
|
|
|||
|
|
- 将项目打包为 `.war` 文件(如 `hessian-server.war`),并放置到 Tomcat 的 `webapps` 目录中。
|
|||
|
|
- 启动 Tomcat,确认服务在 `/helloService` 路径下成功暴露。
|
|||
|
|
|
|||
|
|
* * *
|
|||
|
|
|
|||
|
|
#### 客户端项目
|
|||
|
|
|
|||
|
|
###### 1\. 定义服务接口
|
|||
|
|
|
|||
|
|
在客户端项目中,定义与服务端相同的接口 `HelloService`,以便客户端能识别远程接口:
|
|||
|
|
|
|||
|
|
```
|
|||
|
|
public interface HelloService {
|
|||
|
|
String sayHello(String name);
|
|||
|
|
}
|
|||
|
|
```
|
|||
|
|
|
|||
|
|
###### 2\. 创建 Spring 配置类
|
|||
|
|
|
|||
|
|
在客户端项目中创建 `HessianClientConfig` 配置类,使用 `HessianProxyFactoryBean` 配置远程服务接口:
|
|||
|
|
|
|||
|
|
```
|
|||
|
|
import org.springframework.context.annotation.Bean;
|
|||
|
|
import org.springframework.context.annotation.Configuration;
|
|||
|
|
import org.springframework.remoting.caucho.HessianProxyFactoryBean;
|
|||
|
|
|
|||
|
|
@Configuration
|
|||
|
|
public class HessianClientConfig {
|
|||
|
|
|
|||
|
|
@Bean
|
|||
|
|
public HessianProxyFactoryBean helloService() {
|
|||
|
|
HessianProxyFactoryBean factory = new HessianProxyFactoryBean();
|
|||
|
|
factory.setServiceUrl("http://localhost:8080/SpringWebBase_war/helloService"); // 根据实际服务地址调整
|
|||
|
|
factory.setServiceInterface(HelloService.class);
|
|||
|
|
return factory;
|
|||
|
|
}
|
|||
|
|
}
|
|||
|
|
```
|
|||
|
|
|
|||
|
|
###### 3\. 创建客户端启动类
|
|||
|
|
|
|||
|
|
在客户端项目中编写主类,通过 `AnnotationConfigApplicationContext` 启动 Spring 上下文,并调用远程服务:
|
|||
|
|
|
|||
|
|
```
|
|||
|
|
import org.springframework.context.ApplicationContext;
|
|||
|
|
import org.springframework.context.annotation.AnnotationConfigApplicationContext;
|
|||
|
|
import pojo.HelloService;
|
|||
|
|
|
|||
|
|
public class HessianClientApplication {
|
|||
|
|
|
|||
|
|
public static void main(String[] args) {
|
|||
|
|
// 初始化 Spring 上下文
|
|||
|
|
ApplicationContext context = new AnnotationConfigApplicationContext(HessianClientConfig.class);
|
|||
|
|
|
|||
|
|
// 获取并调用远程服务
|
|||
|
|
HelloService helloService = context.getBean(HelloService.class);
|
|||
|
|
String response = helloService.sayHello("World");
|
|||
|
|
System.out.println(response);
|
|||
|
|
}
|
|||
|
|
}
|
|||
|
|
```
|
|||
|
|
|
|||
|
|
* * *
|
|||
|
|
|
|||
|
|
#### 运行并测试
|
|||
|
|
|
|||
|
|
1. **启动服务端**:将服务端项目部署在 Tomcat 或其他支持 Servlet 的容器中。
|
|||
|
|
2. **启动客户端**:运行 `HessianClientApplication` 主类。应该会在控制台上看到从远程服务返回的消息。
|
|||
|
|
|
|||
|
|
这样,就完成了 Hessian 在 Spring 项目中的集成,实现了一个完整的 RPC 调用系统。
|
|||
|
|
|
|||
|
|

|
|||
|
|
|
|||
|
|
同样的,也可以选择用 SpringBoot 方式启动,其他代码不变,只更改启动类即可。
|
|||
|
|
|
|||
|
|
### 自封装调用
|
|||
|
|
|
|||
|
|
我们可以通过直接使用 `HessianInput`、`HessianOutput` 及其变体(如 `Hessian2Input` 和 `Hessian2Output`)来实现 Hessian 的序列化和反序列化,从而自定义数据的传输或存储逻辑。
|
|||
|
|
|
|||
|
|
#### Hessian
|
|||
|
|
|
|||
|
|
创建一个 `HessianSerializer` 工具类,提供 `serialize` 和 `deserialize` 方法,利用 `HessianOutput` 和 `HessianInput` 来完成序列化和反序列化:
|
|||
|
|
|
|||
|
|
```
|
|||
|
|
import com.caucho.hessian.io.HessianInput;
|
|||
|
|
import com.caucho.hessian.io.HessianOutput;
|
|||
|
|
|
|||
|
|
import java.io.ByteArrayInputStream;
|
|||
|
|
import java.io.ByteArrayOutputStream;
|
|||
|
|
import java.io.IOException;
|
|||
|
|
|
|||
|
|
public class HessianSerializer {
|
|||
|
|
|
|||
|
|
/**
|
|||
|
|
* 将对象序列化为字节数组
|
|||
|
|
*
|
|||
|
|
* @param object 要序列化的对象
|
|||
|
|
* @return 序列化后的字节数组
|
|||
|
|
* @throws IOException 如果序列化失败
|
|||
|
|
*/
|
|||
|
|
public static byte[] serialize(Object object) throws IOException {
|
|||
|
|
try (ByteArrayOutputStream byteArrayOutputStream = new ByteArrayOutputStream()) {
|
|||
|
|
HessianOutput hessianOutput = new HessianOutput(byteArrayOutputStream);
|
|||
|
|
hessianOutput.writeObject(object);
|
|||
|
|
return byteArrayOutputStream.toByteArray();
|
|||
|
|
}
|
|||
|
|
}
|
|||
|
|
|
|||
|
|
/**
|
|||
|
|
* 将字节数组反序列化为对象
|
|||
|
|
*
|
|||
|
|
* @param data 字节数组
|
|||
|
|
* @return 反序列化后的对象
|
|||
|
|
* @throws IOException 如果反序列化失败
|
|||
|
|
*/
|
|||
|
|
public static Object deserialize(byte[] data) throws IOException {
|
|||
|
|
try (ByteArrayInputStream byteArrayInputStream = new ByteArrayInputStream(data)) {
|
|||
|
|
HessianInput hessianInput = new HessianInput(byteArrayInputStream);
|
|||
|
|
return hessianInput.readObject();
|
|||
|
|
}
|
|||
|
|
}
|
|||
|
|
}
|
|||
|
|
```
|
|||
|
|
|
|||
|
|
从中可以看出这个 HessianInput/HessianOutput 在这种情况下可以替代 ObjectInputStream/ObjectOutputStream。
|
|||
|
|
|
|||
|
|
然后我们来定义一个类,用于序列化和反序列化:
|
|||
|
|
|
|||
|
|
```
|
|||
|
|
import java.io.Serializable;
|
|||
|
|
|
|||
|
|
public class User implements Serializable {
|
|||
|
|
private String name;
|
|||
|
|
private int age;
|
|||
|
|
|
|||
|
|
// Constructors, Getters, and Setters
|
|||
|
|
|
|||
|
|
public User(String name, int age) {
|
|||
|
|
this.name = name;
|
|||
|
|
this.age = age;
|
|||
|
|
}
|
|||
|
|
|
|||
|
|
public String getName() {
|
|||
|
|
return name;
|
|||
|
|
}
|
|||
|
|
|
|||
|
|
public void setName(String name) {
|
|||
|
|
this.name = name;
|
|||
|
|
}
|
|||
|
|
|
|||
|
|
public int getAge() {
|
|||
|
|
return age;
|
|||
|
|
}
|
|||
|
|
|
|||
|
|
public void setAge(int age) {
|
|||
|
|
this.age = age;
|
|||
|
|
}
|
|||
|
|
|
|||
|
|
@Override
|
|||
|
|
public String toString() {
|
|||
|
|
return "User{name='" + name + "', age=" + age + '}';
|
|||
|
|
}
|
|||
|
|
}
|
|||
|
|
```
|
|||
|
|
|
|||
|
|
最后是一个主类,调用 HessianSerializer 中的方法,实现序列化和反序列化:
|
|||
|
|
|
|||
|
|
```
|
|||
|
|
import java.io.IOException;
|
|||
|
|
import java.util.Arrays;
|
|||
|
|
|
|||
|
|
public class Main {
|
|||
|
|
|
|||
|
|
public static void main(String[] args) {
|
|||
|
|
try {
|
|||
|
|
// 创建一个 User 对象
|
|||
|
|
User user = new User("Alice", 30);
|
|||
|
|
|
|||
|
|
// 将 User 对象序列化为字节数组
|
|||
|
|
byte[] serializedData = HessianSerializer.serialize(user);
|
|||
|
|
System.out.println("Serialized data: " + serializedData);
|
|||
|
|
|
|||
|
|
// 以 Arrays.toString() 的方式输出字节数组内容
|
|||
|
|
System.out.println("Serialized data (byte array): " + Arrays.toString(serializedData));
|
|||
|
|
|
|||
|
|
// 将字节数组反序列化为 User 对象
|
|||
|
|
User deserializedUser = (User) HessianSerializer.deserialize(serializedData);
|
|||
|
|
System.out.println("Deserialized User: " + deserializedUser);
|
|||
|
|
|
|||
|
|
} catch (IOException e) {
|
|||
|
|
e.printStackTrace();
|
|||
|
|
}
|
|||
|
|
}
|
|||
|
|
}
|
|||
|
|
```
|
|||
|
|
|
|||
|
|
运行结果:
|
|||
|
|
|
|||
|
|

|
|||
|
|
|
|||
|
|
除了 `HessianInput` 和 `HessianOutput`,Hessian 还提供了 `Hessian2Input` 和 `Hessian2Output`,以及 Burlap(XML 序列化)方式。
|
|||
|
|
|
|||
|
|
#### Hessian2
|
|||
|
|
|
|||
|
|
同样的来实现一个序列化和反序列化工具类,将 `HessianOutput` 替换为 `Hessian2Output`,`HessianInput` 替换为 `Hessian2Input` 即可:
|
|||
|
|
|
|||
|
|
```
|
|||
|
|
import com.caucho.hessian.io.Hessian2Input;
|
|||
|
|
import com.caucho.hessian.io.Hessian2Output;
|
|||
|
|
|
|||
|
|
import java.io.ByteArrayInputStream;
|
|||
|
|
import java.io.ByteArrayOutputStream;
|
|||
|
|
import java.io.IOException;
|
|||
|
|
|
|||
|
|
public class Hessian2Serializer {
|
|||
|
|
|
|||
|
|
public static byte[] serialize(Object object) throws IOException {
|
|||
|
|
try (ByteArrayOutputStream byteArrayOutputStream = new ByteArrayOutputStream()) {
|
|||
|
|
Hessian2Output hessian2Output = new Hessian2Output(byteArrayOutputStream);
|
|||
|
|
hessian2Output.writeObject(object);
|
|||
|
|
hessian2Output.close();
|
|||
|
|
return byteArrayOutputStream.toByteArray();
|
|||
|
|
}
|
|||
|
|
}
|
|||
|
|
|
|||
|
|
public static Object deserialize(byte[] data) throws IOException {
|
|||
|
|
try (ByteArrayInputStream byteArrayInputStream = new ByteArrayInputStream(data)) {
|
|||
|
|
Hessian2Input hessian2Input = new Hessian2Input(byteArrayInputStream);
|
|||
|
|
return hessian2Input.readObject();
|
|||
|
|
}
|
|||
|
|
}
|
|||
|
|
}
|
|||
|
|
```
|
|||
|
|
|
|||
|
|
结果:
|
|||
|
|
|
|||
|
|

|
|||
|
|
|
|||
|
|
依然可以成功的序列化和反序列化,只不过序列化数据不一样。
|
|||
|
|
|
|||
|
|
#### Burlap
|
|||
|
|
|
|||
|
|
Burlap 是 Hessian 的一种 XML 格式,可以用于跨语言环境的兼容性。它序列化后的数据是 xml 格式,所以我们用流的 toString 方法来获取序列化数据的字符串格式。
|
|||
|
|
|
|||
|
|
实现一个序列化和反序列化工具类:
|
|||
|
|
|
|||
|
|
```
|
|||
|
|
import java.io.ByteArrayInputStream;
|
|||
|
|
import java.io.ByteArrayOutputStream;
|
|||
|
|
import java.io.IOException;
|
|||
|
|
import java.nio.charset.StandardCharsets;
|
|||
|
|
|
|||
|
|
import com.caucho.burlap.io.BurlapInput;
|
|||
|
|
import com.caucho.burlap.io.BurlapOutput;
|
|||
|
|
|
|||
|
|
public class BurlapSerializer {
|
|||
|
|
|
|||
|
|
public static String serializeToXmlString(Object object) throws IOException {
|
|||
|
|
try (ByteArrayOutputStream byteArrayOutputStream = new ByteArrayOutputStream()) {
|
|||
|
|
BurlapOutput burlapOutput = new BurlapOutput(byteArrayOutputStream);
|
|||
|
|
burlapOutput.writeObject(object);
|
|||
|
|
burlapOutput.flush();
|
|||
|
|
|
|||
|
|
// 将字节数组转换为字符串
|
|||
|
|
return byteArrayOutputStream.toString(String.valueOf(StandardCharsets.UTF_8));
|
|||
|
|
}
|
|||
|
|
}
|
|||
|
|
|
|||
|
|
public static Object deserializeFromXmlString(String xmlData) throws IOException {
|
|||
|
|
try (ByteArrayInputStream byteArrayInputStream = new ByteArrayInputStream(xmlData.getBytes(StandardCharsets.UTF_8))) {
|
|||
|
|
BurlapInput burlapInput = new BurlapInput(byteArrayInputStream);
|
|||
|
|
return burlapInput.readObject();
|
|||
|
|
}
|
|||
|
|
}
|
|||
|
|
}
|
|||
|
|
```
|
|||
|
|
|
|||
|
|
测试主类:
|
|||
|
|
|
|||
|
|
```
|
|||
|
|
import java.io.IOException;
|
|||
|
|
|
|||
|
|
public class Main {
|
|||
|
|
|
|||
|
|
public static void main(String[] args) {
|
|||
|
|
try {
|
|||
|
|
// 创建一个 User 对象
|
|||
|
|
User user = new User("Alice", 30);
|
|||
|
|
|
|||
|
|
// 将 User 对象序列化为 XML 字符串
|
|||
|
|
String xmlData = BurlapSerializer.serializeToXmlString(user);
|
|||
|
|
System.out.println("Serialized XML data:\n" + xmlData);
|
|||
|
|
|
|||
|
|
// 将 XML 字符串反序列化为 User 对象
|
|||
|
|
User deserializedUser = (User) BurlapSerializer.deserializeFromXmlString(xmlData);
|
|||
|
|
System.out.println("Deserialized User: " + deserializedUser);
|
|||
|
|
|
|||
|
|
} catch (IOException e) {
|
|||
|
|
e.printStackTrace();
|
|||
|
|
}
|
|||
|
|
}
|
|||
|
|
}
|
|||
|
|
```
|
|||
|
|
|
|||
|
|
结果:
|
|||
|
|
|
|||
|
|

|
|||
|
|
|
|||
|
|
可以看到序列化后的结果是 xml 格式。
|
|||
|
|
|
|||
|
|
### 配置为 JNDI 资源
|
|||
|
|
|
|||
|
|
还有其他的一些调用方式比如通过 web 服务器(例如 Tomcat )自带的配置功能用 JNDI 的方式获取 hessian 服务,这里就不做详细介绍了,可以参考:[Tomcat - JNDI 资源使用方法](https://tomcat.apache.org/tomcat-9.0-doc/jndi-resources-howto.html#web.xml_configuration) 。
|
|||
|
|
|
|||
|
|
在 HessianProxyFactory 的说明文档中也给出了在 Resin 服务器下配置为 JNDI 资源的示例:
|
|||
|
|
|
|||
|
|

|
|||
|
|
|
|||
|
|
这里就不再演示了。
|
|||
|
|
|
|||
|
|
## Hessian 源码解析
|
|||
|
|
|
|||
|
|
简单的分析一下 Hessian 服务的源码,版本为 4.0.66 。
|
|||
|
|
|
|||
|
|
### HessianServlet 解析
|
|||
|
|
|
|||
|
|
com.caucho.hessian.server.HessianServlet 是在 Servlet 项目中用到的类,下面来分析一下。
|
|||
|
|
|
|||
|
|
HessianServlet 继承了 HttpServlet ,却没有重写 doGet 与 doPost 方法,而是 service 方法在发挥作用。init 方法用于初始化。
|
|||
|
|
|
|||
|
|
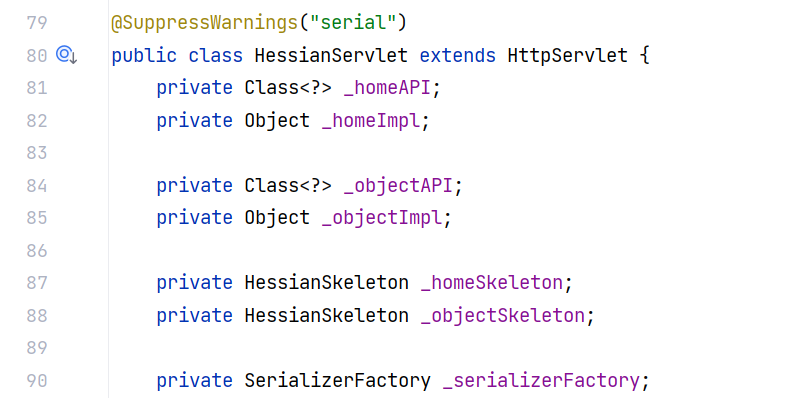
init 方法主要是初始化 HessianServlet 的各成员变量:
|
|||
|
|
|
|||
|
|
|
|||
|
|
我们注意到这里其实有两套相似的成员变量,分别是:
|
|||
|
|
|
|||
|
|
`_homeAPI`、`_homeImpl` 和 `_homeSkeleton`
|
|||
|
|
|
|||
|
|
以及
|
|||
|
|
|
|||
|
|
`_objectAPI`、`_objectImpl` 和 `_objectSkeleton`
|
|||
|
|
|
|||
|
|
事实上,它们各自代表了一组与服务端对象相关的接口、实现类和骨架类。这样设计的意义在于为 Hessian 服务支持两种不同类型的远程调用场景,在某些情况下,Hessian 服务可能既需要一个主接口(`_homeAPI`),也需要一个附加接口(`_objectAPI`)来扩展主服务的功能。
|
|||
|
|
|
|||
|
|
通过定义两组接口和实现类,HessianServlet 既可以为主服务(`_home`)提供基本功能,又可以通过附加服务(`_object`)扩展服务接口。同时,它确保了每个接口都有专门的骨架类(`Skeleton`)来处理特定类型的请求,从而使 Hessian 能够灵活地应对复杂的远程调用需求。
|
|||
|
|
|
|||
|
|
```
|
|||
|
|
public void init(ServletConfig config)
|
|||
|
|
throws ServletException
|
|||
|
|
{
|
|||
|
|
super.init(config);
|
|||
|
|
|
|||
|
|
try {
|
|||
|
|
// 初始化 _homeImpl
|
|||
|
|
if (_homeImpl != null) {
|
|||
|
|
}
|
|||
|
|
else if (getInitParameter("home-class") != null) {
|
|||
|
|
String className = getInitParameter("home-class");
|
|||
|
|
|
|||
|
|
Class<?> homeClass = loadClass(className);
|
|||
|
|
|
|||
|
|
_homeImpl = homeClass.newInstance();
|
|||
|
|
|
|||
|
|
init(_homeImpl);
|
|||
|
|
}
|
|||
|
|
else if (getInitParameter("service-class") != null) {
|
|||
|
|
String className = getInitParameter("service-class");
|
|||
|
|
|
|||
|
|
Class<?> homeClass = loadClass(className);
|
|||
|
|
|
|||
|
|
_homeImpl = homeClass.newInstance();
|
|||
|
|
|
|||
|
|
init(_homeImpl);
|
|||
|
|
}
|
|||
|
|
else {
|
|||
|
|
if (getClass().equals(HessianServlet.class))
|
|||
|
|
throw new ServletException("server must extend HessianServlet");
|
|||
|
|
|
|||
|
|
_homeImpl = this;
|
|||
|
|
}
|
|||
|
|
|
|||
|
|
// 初始化 _homeAPI
|
|||
|
|
if (_homeAPI != null) {
|
|||
|
|
}
|
|||
|
|
else if (getInitParameter("home-api") != null) {
|
|||
|
|
String className = getInitParameter("home-api");
|
|||
|
|
|
|||
|
|
_homeAPI = loadClass(className);
|
|||
|
|
}
|
|||
|
|
else if (getInitParameter("api-class") != null) {
|
|||
|
|
String className = getInitParameter("api-class");
|
|||
|
|
|
|||
|
|
_homeAPI = loadClass(className);
|
|||
|
|
}
|
|||
|
|
else if (_homeImpl != null) {
|
|||
|
|
_homeAPI = findRemoteAPI(_homeImpl.getClass());
|
|||
|
|
|
|||
|
|
if (_homeAPI == null)
|
|||
|
|
_homeAPI = _homeImpl.getClass();
|
|||
|
|
|
|||
|
|
_homeAPI = _homeImpl.getClass();
|
|||
|
|
}
|
|||
|
|
|
|||
|
|
// 初始化 _objectImpl
|
|||
|
|
if (_objectImpl != null) {
|
|||
|
|
}
|
|||
|
|
else if (getInitParameter("object-class") != null) {
|
|||
|
|
String className = getInitParameter("object-class");
|
|||
|
|
|
|||
|
|
Class<?> objectClass = loadClass(className);
|
|||
|
|
|
|||
|
|
_objectImpl = objectClass.newInstance();
|
|||
|
|
|
|||
|
|
init(_objectImpl);
|
|||
|
|
}
|
|||
|
|
// 初始化 _objectAPI
|
|||
|
|
if (_objectAPI != null) {
|
|||
|
|
}
|
|||
|
|
else if (getInitParameter("object-api") != null) {
|
|||
|
|
String className = getInitParameter("object-api");
|
|||
|
|
|
|||
|
|
_objectAPI = loadClass(className);
|
|||
|
|
}
|
|||
|
|
else if (_objectImpl != null)
|
|||
|
|
_objectAPI = _objectImpl.getClass();
|
|||
|
|
|
|||
|
|
// 初始化 _homeSkeleton
|
|||
|
|
_homeSkeleton = new HessianSkeleton(_homeImpl, _homeAPI);
|
|||
|
|
|
|||
|
|
if (_objectAPI != null)
|
|||
|
|
_homeSkeleton.setObjectClass(_objectAPI);
|
|||
|
|
|
|||
|
|
// 初始化 _objectSkeleton
|
|||
|
|
if (_objectImpl != null) {
|
|||
|
|
_objectSkeleton = new HessianSkeleton(_objectImpl, _objectAPI);
|
|||
|
|
_objectSkeleton.setHomeClass(_homeAPI);
|
|||
|
|
}
|
|||
|
|
else
|
|||
|
|
_objectSkeleton = _homeSkeleton;
|
|||
|
|
|
|||
|
|
if ("true".equals(getInitParameter("debug"))) {
|
|||
|
|
}
|
|||
|
|
|
|||
|
|
if ("false".equals(getInitParameter("send-collection-type")))
|
|||
|
|
setSendCollectionType(false);
|
|||
|
|
} catch (ServletException e) {
|
|||
|
|
throw e;
|
|||
|
|
} catch (Exception e) {
|
|||
|
|
throw new ServletException(e);
|
|||
|
|
}
|
|||
|
|
}
|
|||
|
|
```
|
|||
|
|
|
|||
|
|
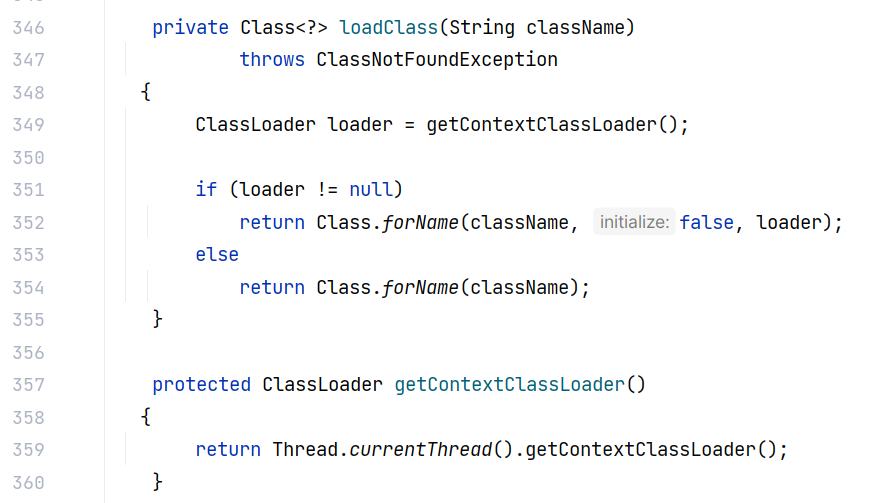
这里使用了 HessianServlet 自定义的 loadClass 和 getContextClassLoader 方法,从当前线程中获取类加载器:
|
|||
|
|
|
|||
|
|
|
|||
|
|
如 su18 师傅所说,主要是有两个原因:
|
|||
|
|
|
|||
|
|
1. **保证类加载的一致性**: 在一些复杂环境下,尤其是应用服务器或容器中,系统可能会引入自定义的类加载器来对类进行重新加载、隔离或增强。比如在微服务、插件式架构或其他需要动态加载的场景中,用户的类可能会被不同的类加载器重新加载,造成类不一致的问题。这种自定义的 `loadClass` 方法通过指定类加载器的来源,确保加载到的是期望的类,而不是可能被“魔改”的类。
|
|||
|
|
|
|||
|
|
2. **利用线程上下文的类加载器快速定位用户的类**: 在 Java 应用中,通常可以通过 `Thread.currentThread().getContextClassLoader()` 来获取当前线程的上下文类加载器(通常是 `AppClassLoader`),这是加载用户类的默认类加载器。相比直接使用 `SystemClassLoader`,这种方式会更快速地找到当前应用需要的类。由于 `AppClassLoader` 通常直接与用户代码绑定,这种方法保证了 `HessianServlet` 能快速、准确地访问到应用中定义的类,而不必依赖于更高层次的类加载器(如 `BootStrapClassLoader` 或 `ExtClassLoader`),从而减少不必要的加载和可能的冲突。
|
|||
|
|
|
|||
|
|
|
|||
|
|
这种设计可以让 HessianServlet 在不同的类加载器环境中工作时更稳定,同时更高效地访问应用的自定义类。
|
|||
|
|
|
|||
|
|
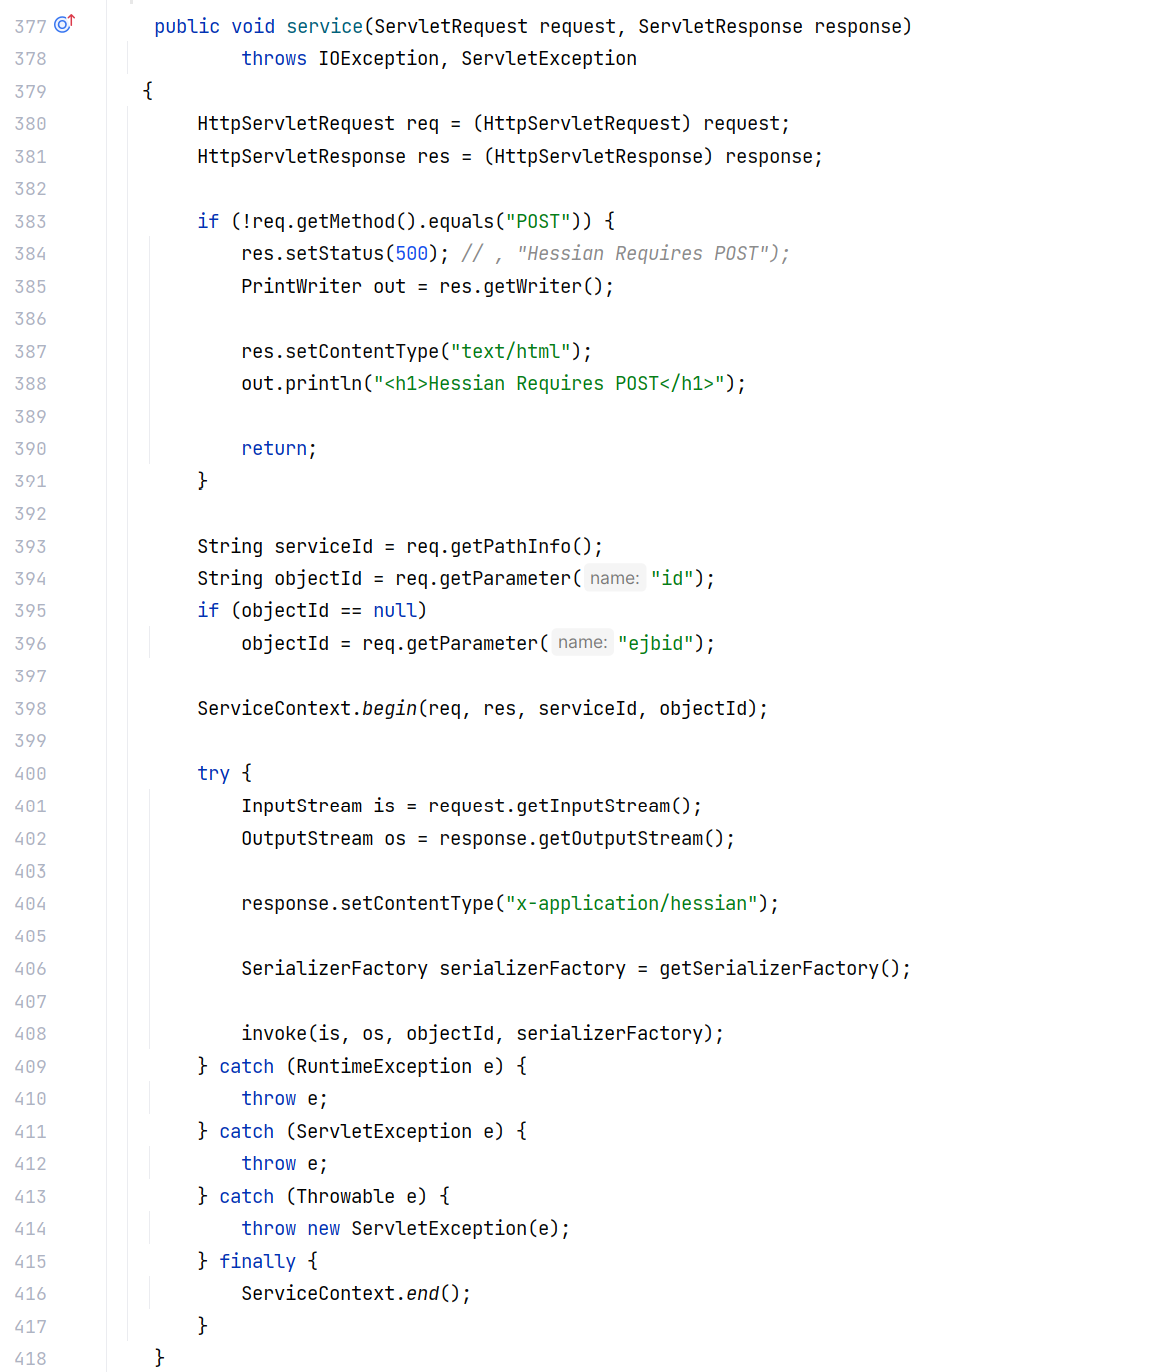
接下来是 HessianServlet 的 service 方法:
|
|||
|
|
|
|||
|
|
|
|||
|
|
|
|||
|
|
可以看到,如果请求方式不是 POST ,直接返回 500 状态码,也就是说这边只能用 POST 方式来请求服务。在获取了 objectId 和 serializerFactory 之后,实际调用 invoke 方法来进行处理。
|
|||
|
|
|
|||
|
|
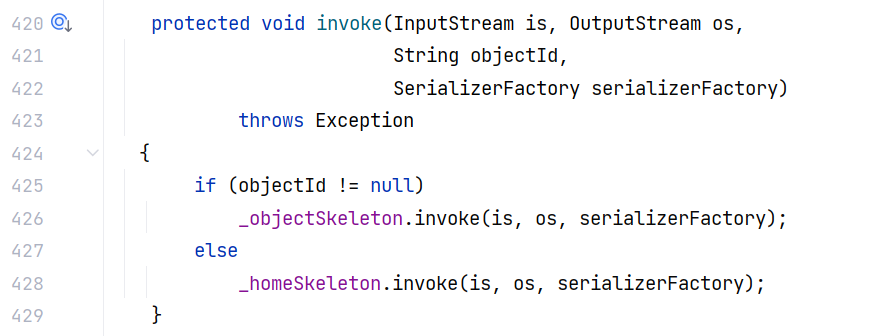
HessianServlet 的 invoke 方法根据 objectId 的不同,选择调用其成员属性 \_objectSkeleton 还是 \_homeSkeleton 来处理:
|
|||
|
|
|
|||
|
|
|
|||
|
|
|
|||
|
|
而这两者都是 HessianSkeleton 类型,所以接下来毫无疑问会进入 HessianSkeleton 的 invoke 方法。Skeleton 一般表示服务端用于处理客户端请求的“骨架”。
|
|||
|
|
|
|||
|
|
### HessianSkeleton 解析
|
|||
|
|
|
|||
|
|
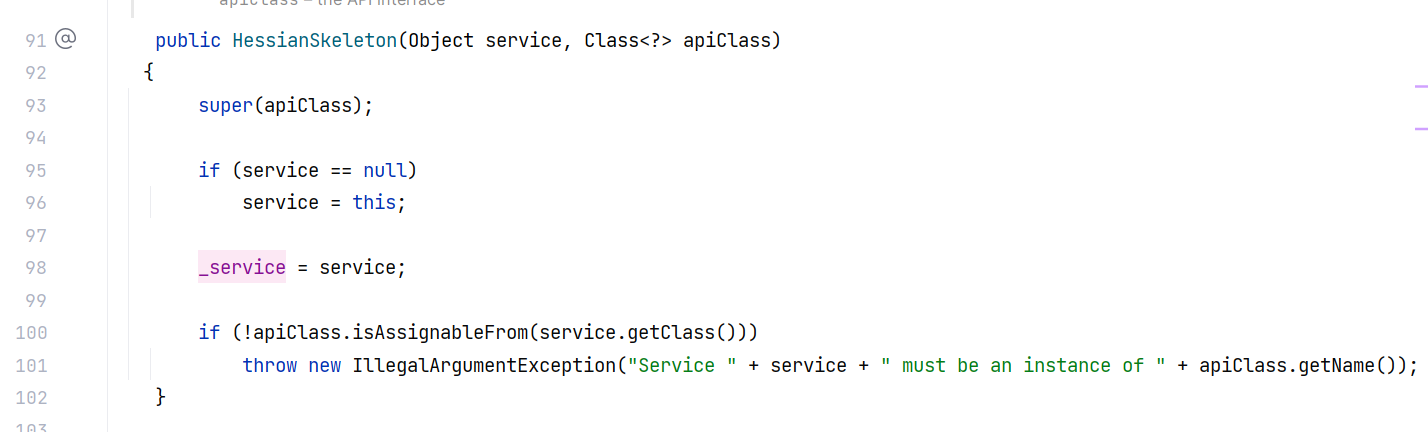
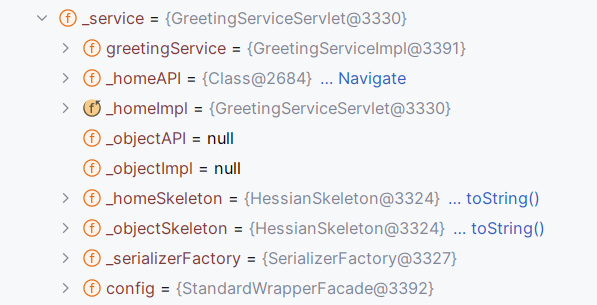
HessianSkeleton 初始化时先调用父类 AbstractSkeleton 的初始化方法,然后将当前提供远程服务的 Servlet 类封装到成员变量 \_service 中:
|
|||
|
|
|
|||
|
|
|
|||
|
|
|
|||
|
|
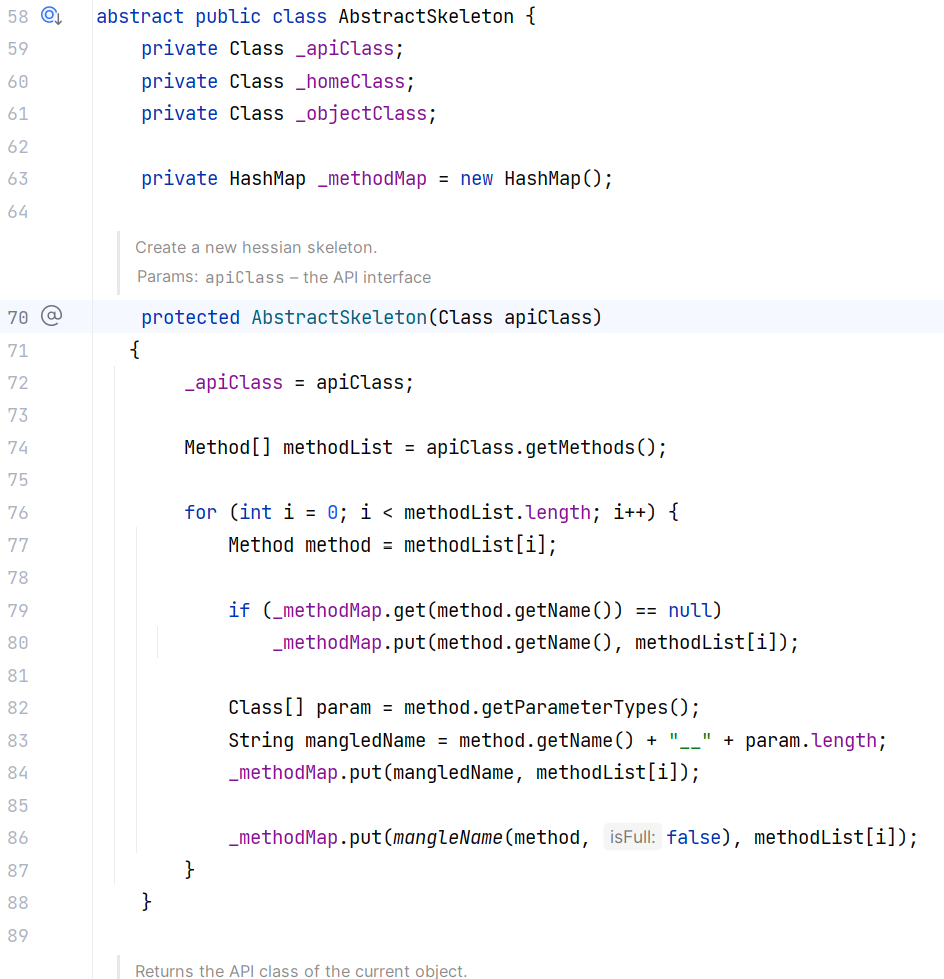
而其父类 AbstractSkeleton 初始化时则会将当前提供服务的 Servlet 类的所有方法和参数放进成员变量 \_methodMap 中:
|
|||
|
|
|
|||
|
|
|
|||
|
|
|
|||
|
|
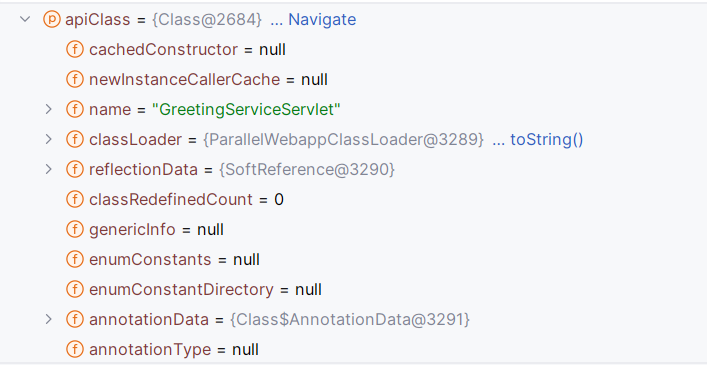
调试起来可以知道这里的 apiClass 就是 GreetingServiceServlet :
|
|||
|
|
|
|||
|
|
|
|||
|
|
|
|||
|
|
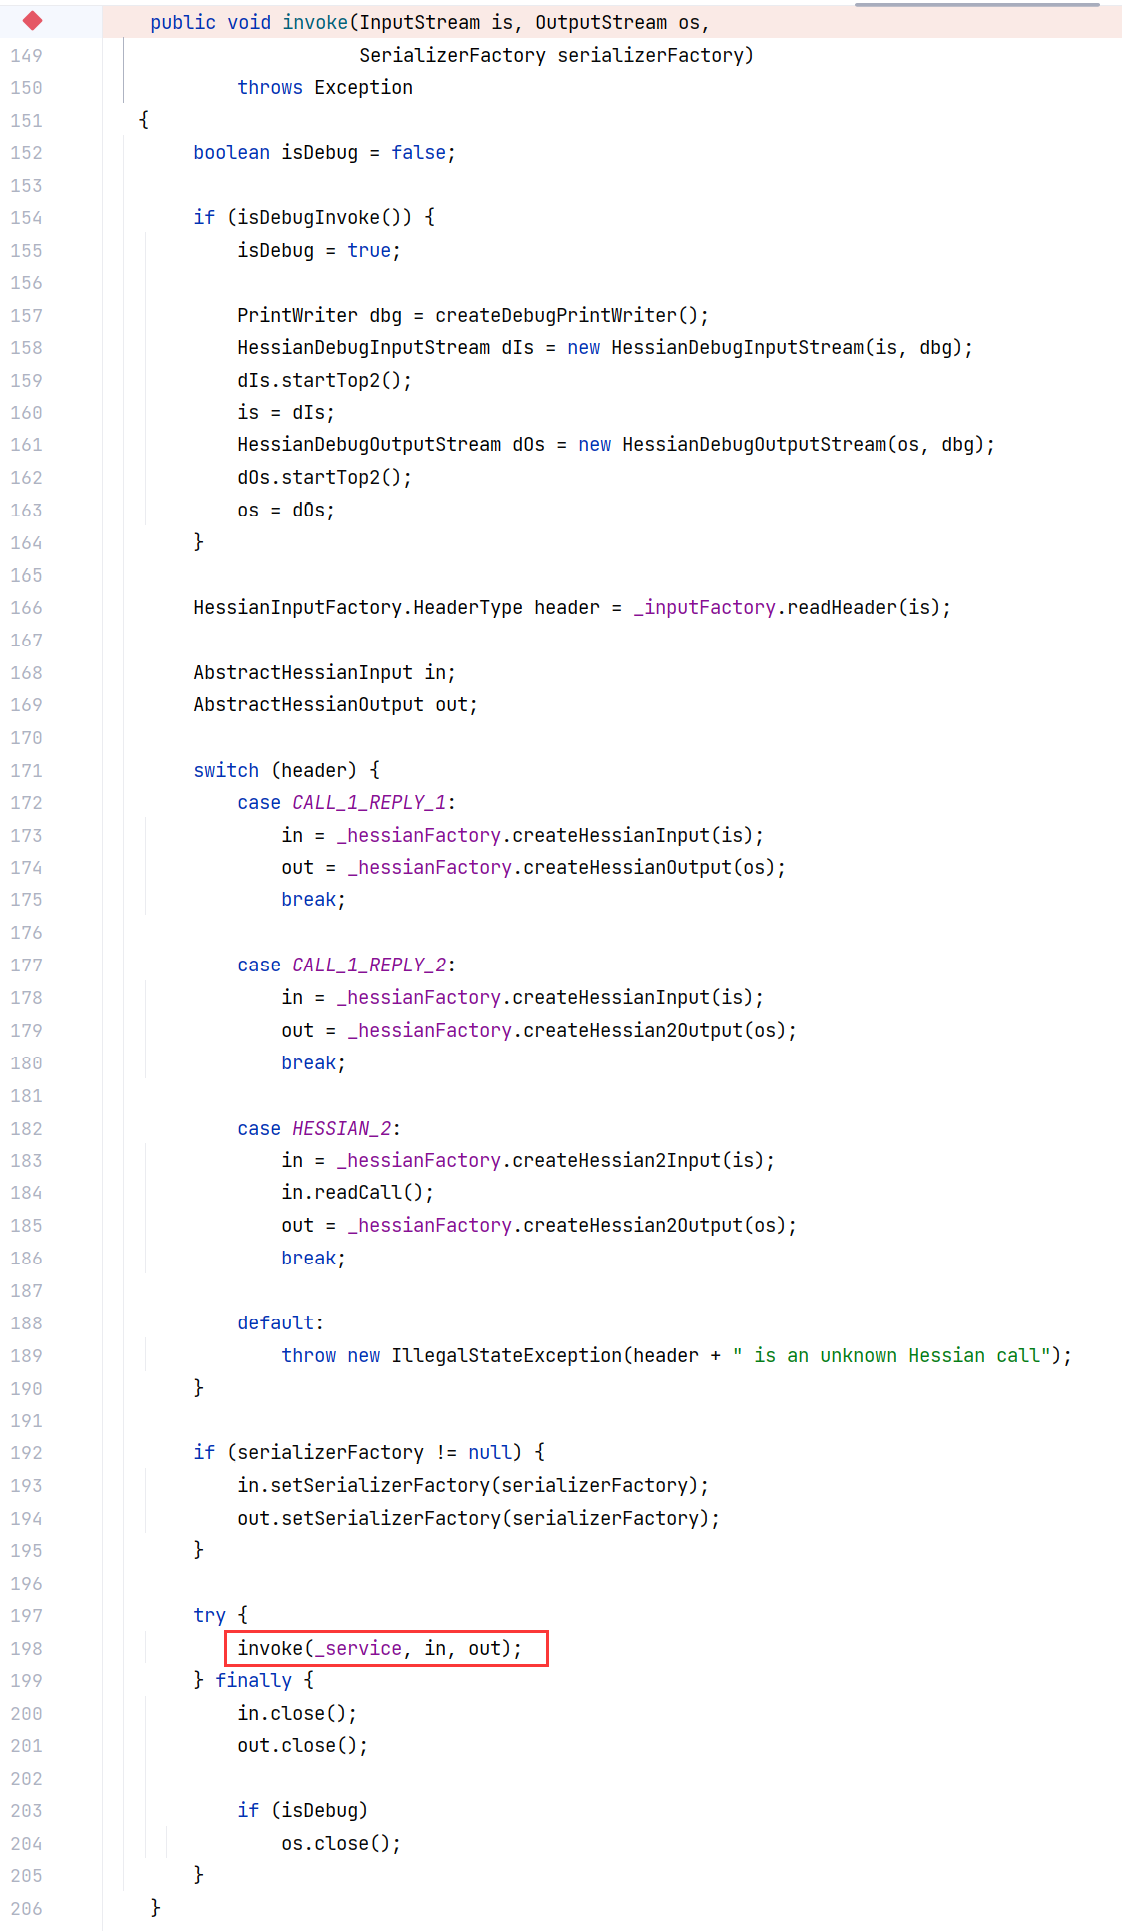
接着来看 HessianSkeleton 的 invoke 方法,HessianServlet 最终是调用到 HessianSkeleton 的 invoke(InputStream, OutputStream, SerializerFactory) 方法:
|
|||
|
|
|
|||
|
|
|
|||
|
|
|
|||
|
|
这个方法主要是根据 header 字段的不同,通过不同的方式获取到序列化与反序列化字节流,并最终调用 `invoke(Object, AbstractHessianInput, AbstractHessianOutput)` 来处理。从处理方式也可以看出是兼容了 hessian 1.0 和 hessian 2.0 。
|
|||
|
|
|
|||
|
|
invoke(Object, AbstractHessianInput, AbstractHessianOutput) 方法则是将参数反序列化,进行远程方法的调用并将结果写入序列化字节流:
|
|||
|
|
|
|||
|
|
```
|
|||
|
|
public void invoke(Object service,
|
|||
|
|
AbstractHessianInput in,
|
|||
|
|
AbstractHessianOutput out)
|
|||
|
|
throws Exception
|
|||
|
|
{
|
|||
|
|
ServiceContext context = ServiceContext.getContext();
|
|||
|
|
|
|||
|
|
// backward compatibility for some frameworks that don't read
|
|||
|
|
// the call type first
|
|||
|
|
in.skipOptionalCall();
|
|||
|
|
|
|||
|
|
// Hessian 1.0 backward compatibility
|
|||
|
|
// Hessian 1.0 向后兼容性处理,循环读取客户端传递的请求头信息并存储在 ServiceContext 中。
|
|||
|
|
String header;
|
|||
|
|
while ((header = in.readHeader()) != null) {
|
|||
|
|
Object value = in.readObject();
|
|||
|
|
|
|||
|
|
context.addHeader(header, value);
|
|||
|
|
}
|
|||
|
|
|
|||
|
|
// 读取客户端请求的远程方法名 methodName 和参数个数 argLength
|
|||
|
|
String methodName = in.readMethod();
|
|||
|
|
int argLength = in.readMethodArgLength();
|
|||
|
|
|
|||
|
|
Method method;
|
|||
|
|
|
|||
|
|
// 尝试根据方法名和参数数量组合(如 methodName__argLength)查找对应的方法
|
|||
|
|
method = getMethod(methodName + "__" + argLength);
|
|||
|
|
// 如果没有找到,则仅使用方法名进行查找,以便兼容不同参数的重载方法。
|
|||
|
|
if (method == null)
|
|||
|
|
method = getMethod(methodName);
|
|||
|
|
|
|||
|
|
if (method != null) {
|
|||
|
|
}
|
|||
|
|
// 如果请求的方法名为 _hessian_getAttribute,则认为这是一个特殊的系统调用,
|
|||
|
|
// 用于获取服务的特定属性(如 java.api.class、java.home.class 等),返回相应的属性值。
|
|||
|
|
else if ("_hessian_getAttribute".equals(methodName)) {
|
|||
|
|
String attrName = in.readString();
|
|||
|
|
in.completeCall();
|
|||
|
|
|
|||
|
|
String value = null;
|
|||
|
|
|
|||
|
|
if ("java.api.class".equals(attrName))
|
|||
|
|
value = getAPIClassName();
|
|||
|
|
else if ("java.home.class".equals(attrName))
|
|||
|
|
value = getHomeClassName();
|
|||
|
|
else if ("java.object.class".equals(attrName))
|
|||
|
|
value = getObjectClassName();
|
|||
|
|
|
|||
|
|
out.writeReply(value);
|
|||
|
|
out.close();
|
|||
|
|
return;
|
|||
|
|
}
|
|||
|
|
else if (method == null) {
|
|||
|
|
out.writeFault("NoSuchMethodException",
|
|||
|
|
escapeMessage("The service has no method named: " + in.getMethod()),
|
|||
|
|
null);
|
|||
|
|
out.close();
|
|||
|
|
return;
|
|||
|
|
}
|
|||
|
|
|
|||
|
|
Class<?> []args = method.getParameterTypes();
|
|||
|
|
|
|||
|
|
if (argLength != args.length && argLength >= 0) {
|
|||
|
|
out.writeFault("NoSuchMethod",
|
|||
|
|
escapeMessage("method " + method + " argument length mismatch, received length=" + argLength),
|
|||
|
|
null);
|
|||
|
|
out.close();
|
|||
|
|
return;
|
|||
|
|
}
|
|||
|
|
|
|||
|
|
Object []values = new Object[args.length];
|
|||
|
|
|
|||
|
|
// 将参数值反序列化保存在 values 数组中。
|
|||
|
|
for (int i = 0; i < args.length; i++) {
|
|||
|
|
// XXX: needs Marshal object
|
|||
|
|
values[i] = in.readObject(args[i]);
|
|||
|
|
}
|
|||
|
|
|
|||
|
|
Object result = null;
|
|||
|
|
|
|||
|
|
try {
|
|||
|
|
// 方法调用
|
|||
|
|
result = method.invoke(service, values);
|
|||
|
|
} catch (Exception e) {
|
|||
|
|
Throwable e1 = e;
|
|||
|
|
if (e1 instanceof InvocationTargetException)
|
|||
|
|
e1 = ((InvocationTargetException) e).getTargetException();
|
|||
|
|
|
|||
|
|
log.log(Level.FINE, this + " " + e1.toString(), e1);
|
|||
|
|
|
|||
|
|
out.writeFault("ServiceException",
|
|||
|
|
escapeMessage(e1.getMessage()),
|
|||
|
|
e1);
|
|||
|
|
out.close();
|
|||
|
|
return;
|
|||
|
|
}
|
|||
|
|
|
|||
|
|
// The complete call needs to be after the invoke to handle a
|
|||
|
|
// trailing InputStream
|
|||
|
|
in.completeCall();
|
|||
|
|
|
|||
|
|
// 结果写入序列化字节流
|
|||
|
|
out.writeReply(result);
|
|||
|
|
|
|||
|
|
out.close();
|
|||
|
|
}
|
|||
|
|
```
|
|||
|
|
|
|||
|
|
### HessianServiceExporter 解析
|
|||
|
|
|
|||
|
|
org.springframework.remoting.caucho.HessianServiceExporter 是在 Spring 项目中用来提供 hessian 服务的关键类,下面来看它的源码。
|
|||
|
|
|
|||
|
|
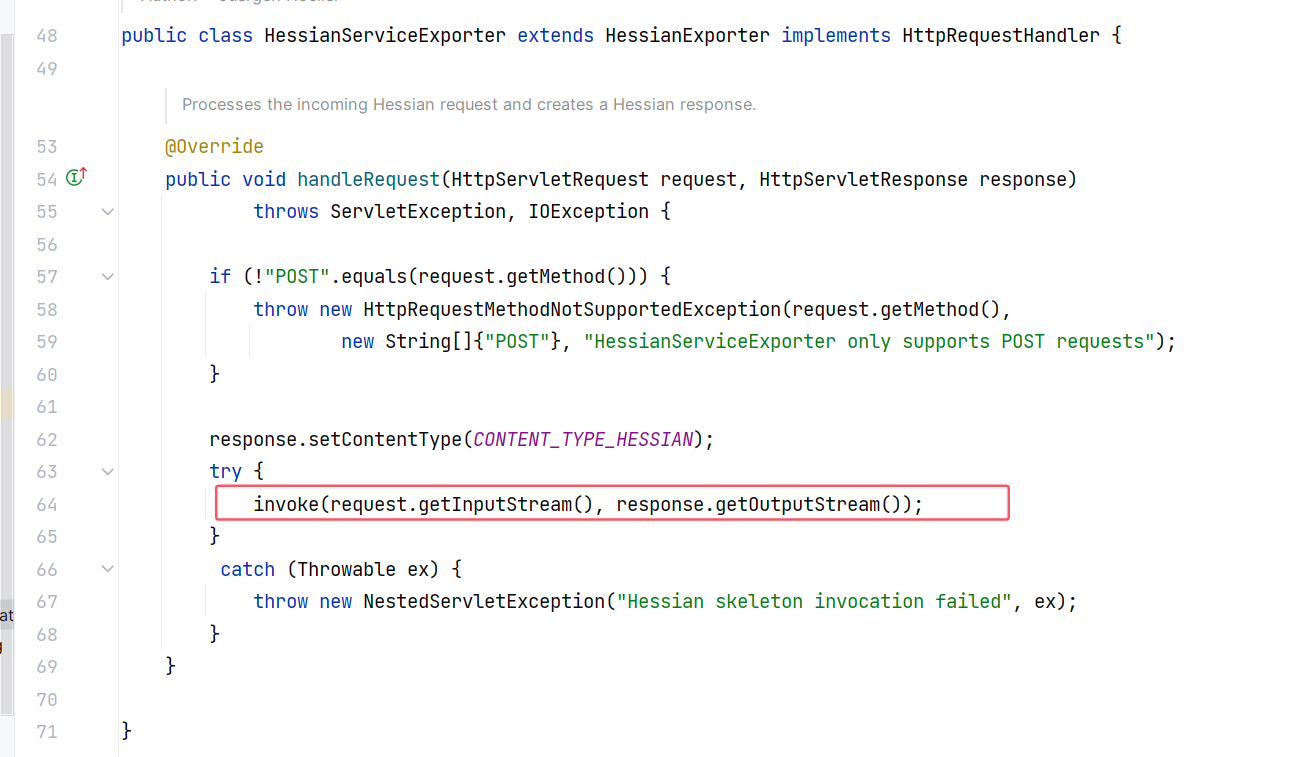
HessianServiceExporter 实现了 HttpRequestHandler 接口,重写了 handleRequest 方法:
|
|||
|
|
|
|||
|
|
|
|||
|
|
|
|||
|
|
这边也是一样只能用 POST 方式请求。然后将请求和响应的字节流传入父类的 invoke 方法进行处理。
|
|||
|
|
|
|||
|
|
父类 HessianExporter 的 invoke 方法也是直接调用 doInvoke :
|
|||
|
|
|
|||
|
|

|
|||
|
|
|
|||
|
|
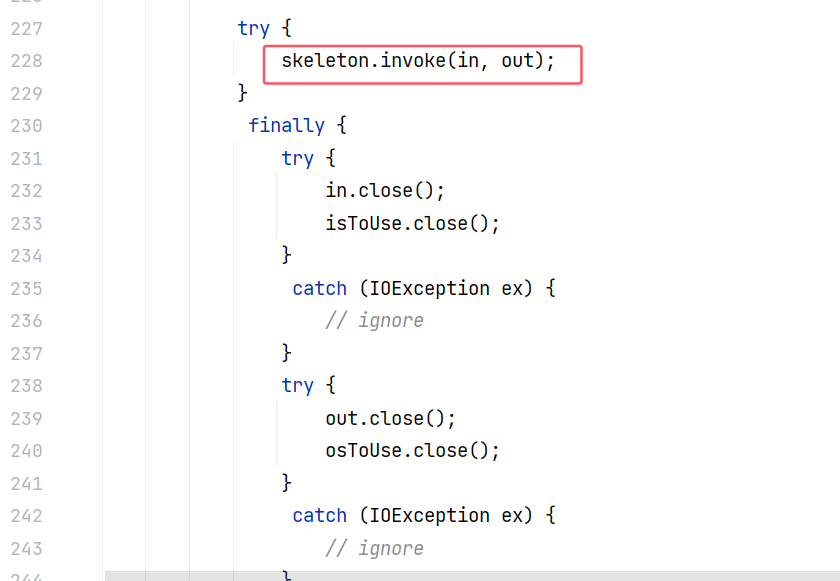
HessianExporter 的 doInvoke 方法流程其实跟 HessianSkeleton 的 invoke(InputStream, OutputStream, SerializerFactory) 方法差不多,最后调用到 HessianSkeleton 的 invoke(AbstractHessianInput, AbstractHessianOutput) 方法:
|
|||
|
|
|
|||
|
|
|
|||
|
|
|
|||
|
|
后续就是调 HessianSkeleton 的 invoke(Object, AbstractHessianInput, AbstractHessianOutput) 方法,前面已经分析过了。
|
|||
|
|
|
|||
|
|
### 序列化与反序列化解析
|
|||
|
|
|
|||
|
|
Hessian 提供了 AbstractHessianInput/AbstractHessianOutput 两个接口来实现序列化和反序列化功能。Hessian/Hessian2/Burlap 都有各自的实现逻辑。
|
|||
|
|
|
|||
|
|
#### 序列化
|
|||
|
|
|
|||
|
|
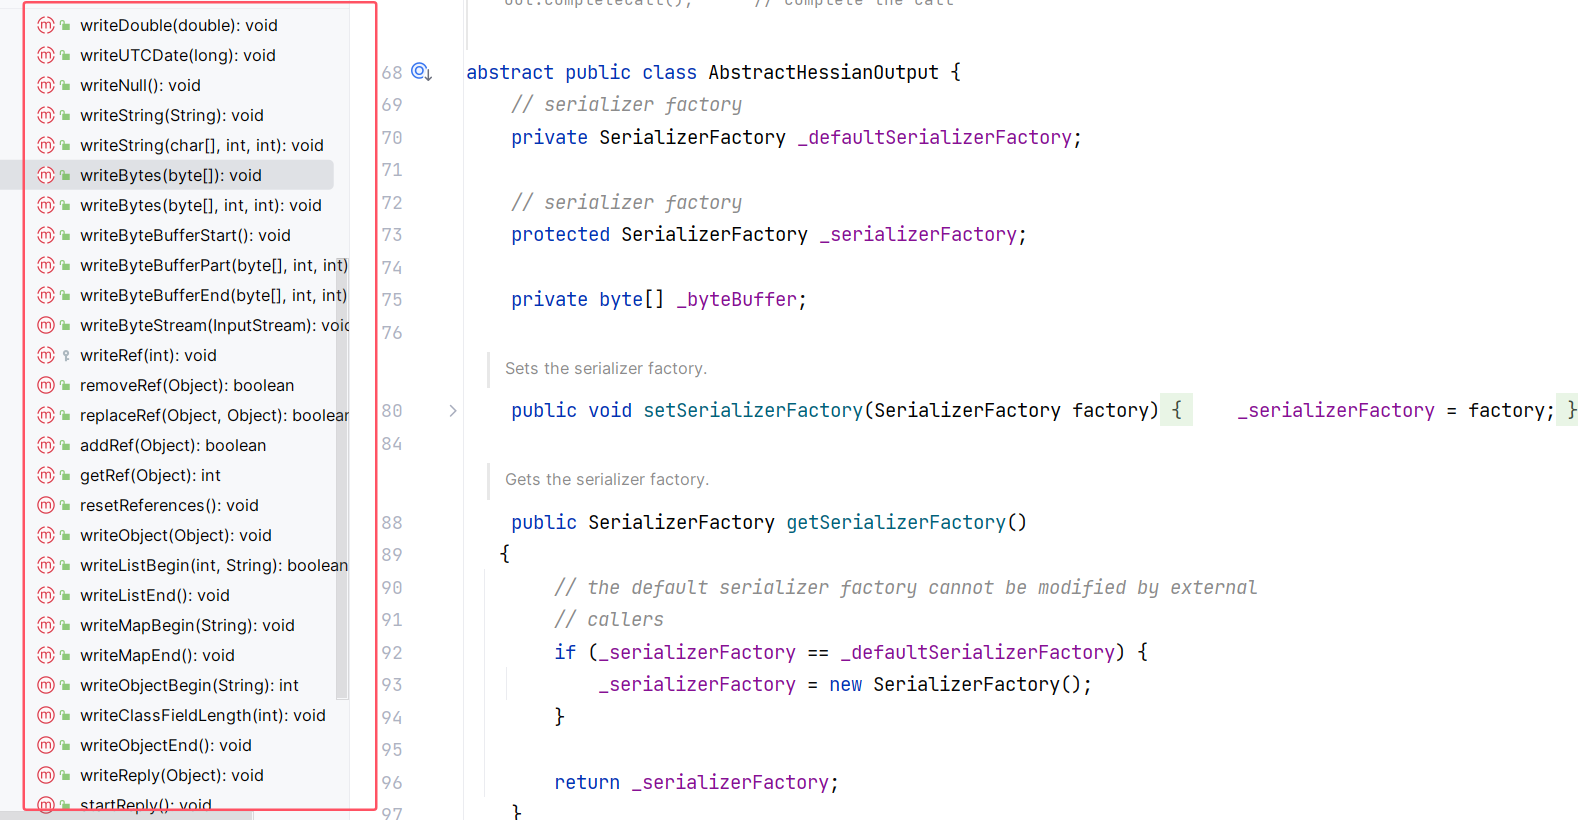
先来看序列化,AbstractHessianOutput 提供了一系列 writeXxx 方法来将不同类型的数据序列化:
|
|||
|
|
|
|||
|
|
|
|||
|
|
|
|||
|
|
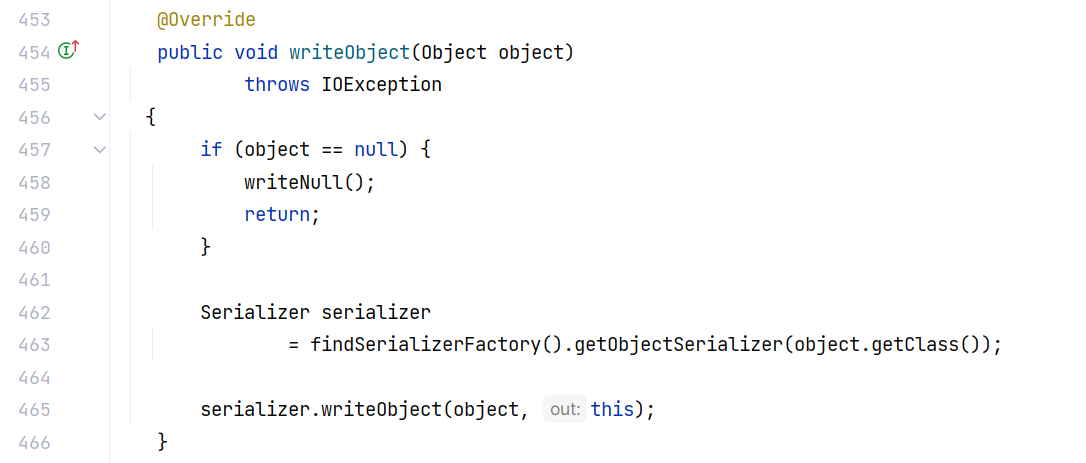
以其实现类 Hessian2Output 为例,writeObject 方法实现了将对象序列化的功能:
|
|||
|
|
|
|||
|
|
|
|||
|
|
|
|||
|
|
这里是先根据对象的类型获取了一个序列化器 Serializer ,然后调用其 writeObject 方法。
|
|||
|
|
|
|||
|
|
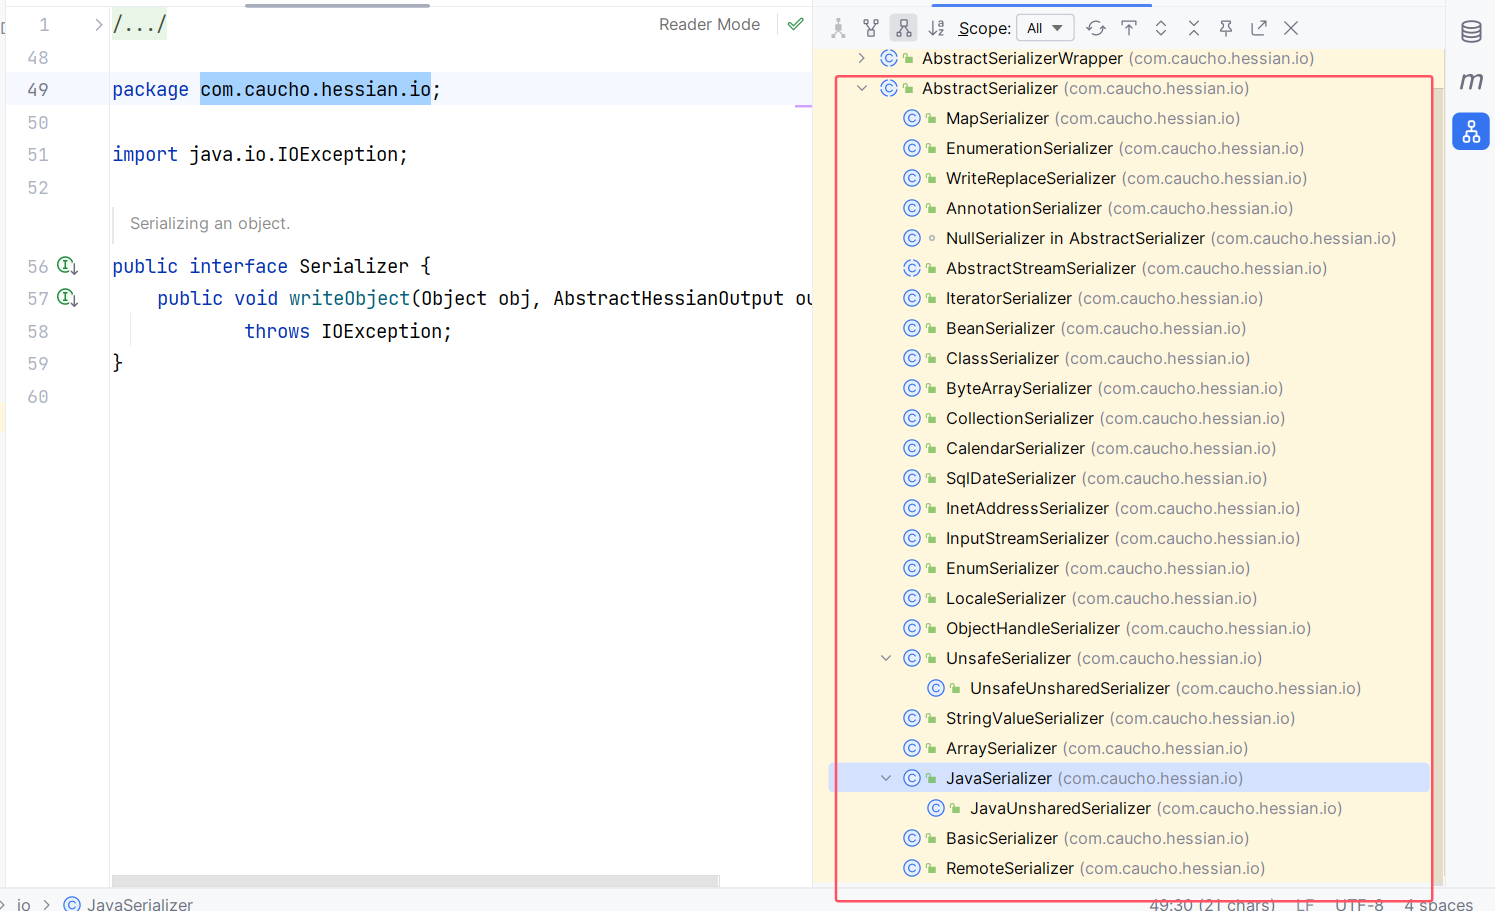
查看 com.caucho.hessian.io.Serializer 的继承关系可知,一共有这么些序列化器用来处理不同类型的数据:
|
|||
|
|
|
|||
|
|
|
|||
|
|
|
|||
|
|
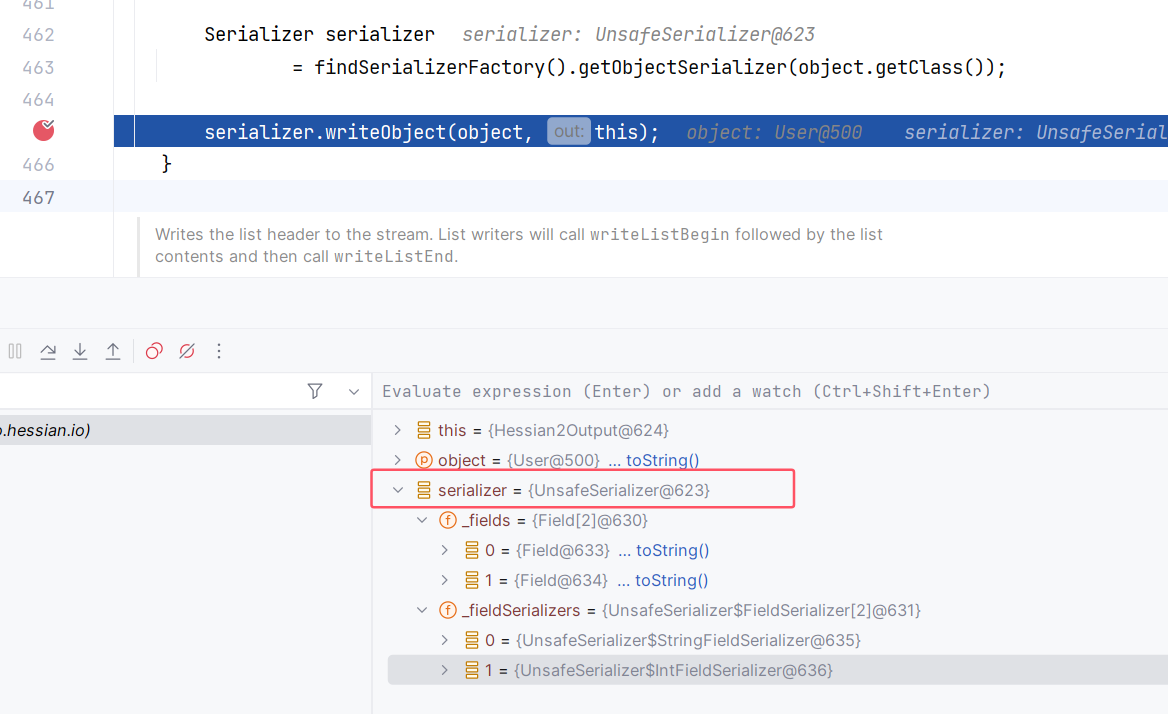
不过对于自定义的类,将会使用 JavaSerializer/UnsafeSerializer/JavaUnsharedSerializer 进行相关的序列化动作,默认情况下是 UnsafeSerializer :
|
|||
|
|
|
|||
|
|
|
|||
|
|
|
|||
|
|
既然默认调用到的是 UnsafeSerializer 的 writeObject 方法,我们就来关注一下它:
|
|||
|
|
|
|||
|
|
```
|
|||
|
|
@Override
|
|||
|
|
public void writeObject(Object obj, AbstractHessianOutput out) throws IOException {
|
|||
|
|
// 检查是否已经序列化过该对象
|
|||
|
|
if (out.addRef(obj)) { // 如果已序列化过则直接写引用(避免重复序列化相同对象)
|
|||
|
|
return;
|
|||
|
|
}
|
|||
|
|
|
|||
|
|
// 获取对象的类信息
|
|||
|
|
Class<?> cl = obj.getClass();
|
|||
|
|
|
|||
|
|
// 写入对象的初始定义并获取引用
|
|||
|
|
int ref = out.writeObjectBegin(cl.getName());
|
|||
|
|
|
|||
|
|
// 根据 Hessian 协议版本做不同处理
|
|||
|
|
if (ref >= 0) {
|
|||
|
|
// 如果 ref >= 0,表示该对象已经写入过结构定义,仅需要写入实例
|
|||
|
|
writeInstance(obj, out);
|
|||
|
|
} else if (ref == -1) {
|
|||
|
|
// 如果 ref == -1,表示是 Hessian 2.0 的初次定义,需写入对象的结构定义
|
|||
|
|
writeDefinition20(out); // 定义对象结构(字段名和类型)
|
|||
|
|
out.writeObjectBegin(cl.getName()); // 再次标记对象起始
|
|||
|
|
writeInstance(obj, out); // 写入实例字段值
|
|||
|
|
} else {
|
|||
|
|
// 如果 ref < 0,表示使用 Hessian 1.0 协议格式进行序列化
|
|||
|
|
writeObject10(obj, out); // 使用 Hessian 1.0 写入完整对象数据
|
|||
|
|
}
|
|||
|
|
}
|
|||
|
|
```
|
|||
|
|
|
|||
|
|
Hessian2Output 是调用 writeObjectBegin 将对象标记为 Object 类型,也即在开头写入 Object 标识符,并最终调用 writeInstance 来处理。而在 Hessian 1.0 和 Burlap 中,写入自定义数据类型(Object)时,都会调用 writeMapBegin 方法将其标记为 Map 类型,也即在开头写入 Map 标识符。从序列化的差异也能猜出反序列化的不同。
|
|||
|
|
|
|||
|
|
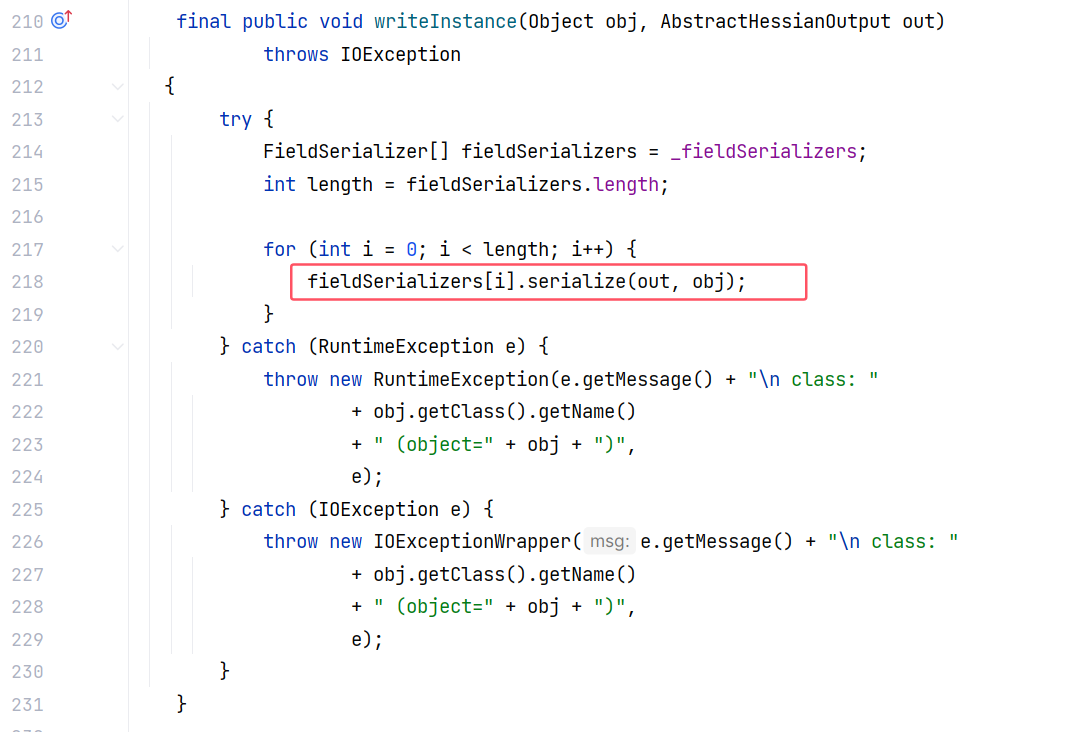
UnsafeSerializer 的 writeInstance 方法则是遍历其成员属性 \_fieldSerializers 中的每一个序列化器,都调用其 serialize 方法处理一遍:
|
|||
|
|
|
|||
|
|
|
|||
|
|
|
|||
|
|
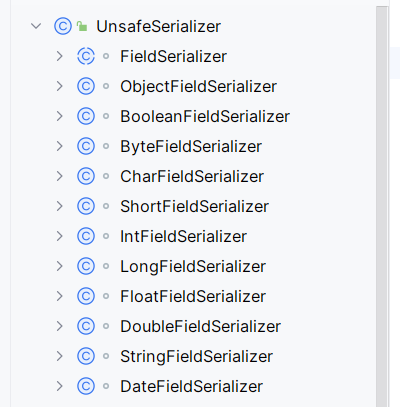
成员属性 \_fieldSerializers 中的序列化器则可以是其内部定义的任何序列化器:
|
|||
|
|
|
|||
|
|
|
|||
|
|
那么 \_fieldSerializers 是如何赋值的呢?
|
|||
|
|
|
|||
|
|
构造方法 -> introspect(Class<?> cl) -> getFieldSerializer(Field field) 根据不同的字段类型获取不同的内部 Serializer 。
|
|||
|
|
|
|||
|
|
字段类型从哪来?
|
|||
|
|
|
|||
|
|
字段类型来自于类的属性类型,比如一个序列化的类有 String 和 int 两种类型的属性,那么就会获取到 StringFieldSerializer 和 IntFieldSerializer 两种序列化器。
|
|||
|
|
|
|||
|
|

|
|||
|
|
|
|||
|
|
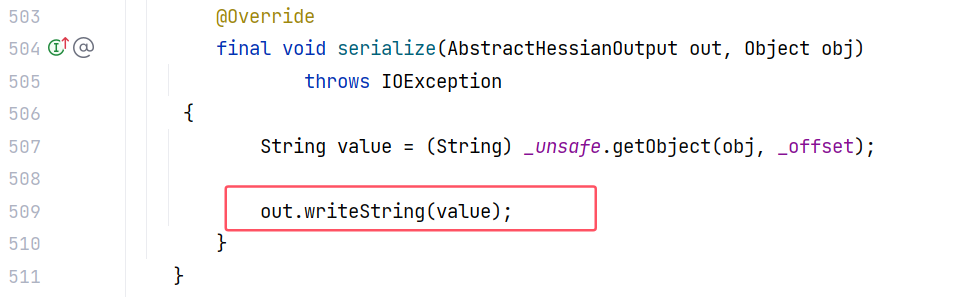
而在序列化器中,对于基本类型的属性的序列化,事实上最终还是调用到 Hessian2Output 的 writeXxx :
|
|||
|
|
|
|||
|
|
|
|||
|
|
|
|||
|
|
对于对象的序列化,最终调用 Hessian2Output 的 writeObject ,又是一个新的轮回,再次解构字段的字段。
|
|||
|
|
|
|||
|
|
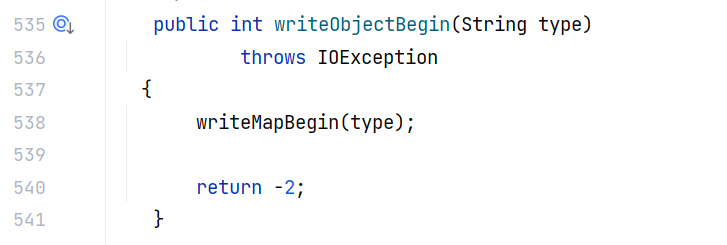
AbstractHessianOutput 其实提供了 writeObjectBegin 方法,只不过里面是直接调用 writeMapBegin :
|
|||
|
|
|
|||
|
|
|
|||
|
|
|
|||
|
|
Hessian2Output 重写了此 writeObjectBegin 方法,给出了具体的实现。而在 hessian 1.0 版本中,HessianOutput 并没有重写此方法,所以当 UnsafeSerializer 的 writeObject 方法调用 HessianOutput 的 writeObjectBegin 方法时,实际上是调用 writeMapBegin 写入 Map 标识符。
|
|||
|
|
|
|||
|
|
#### 反序列化
|
|||
|
|
|
|||
|
|
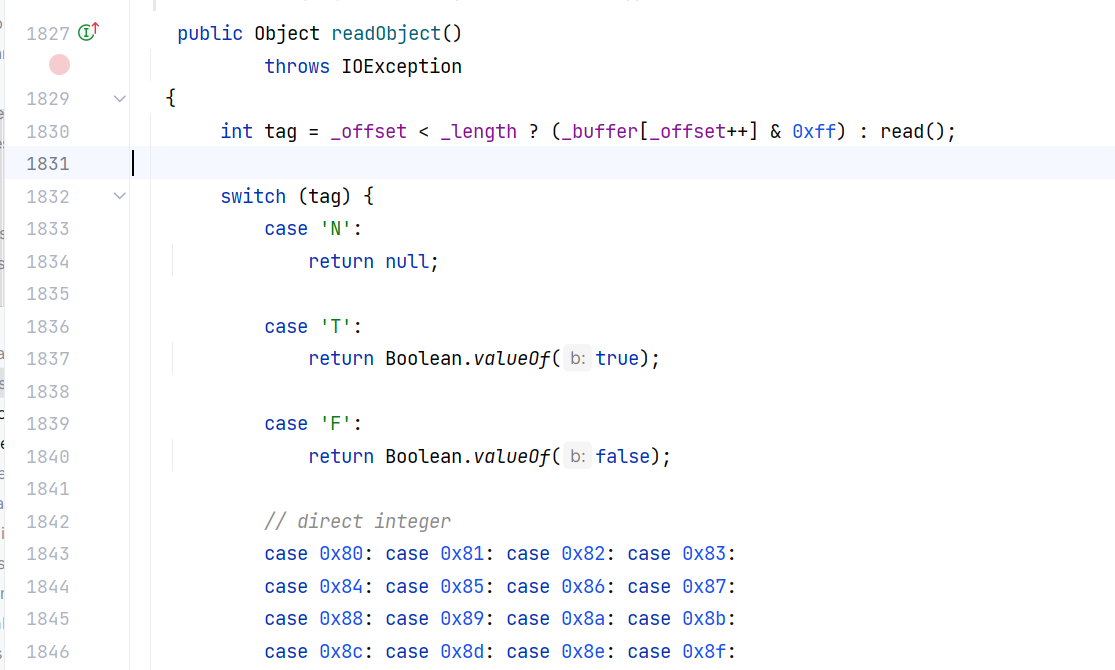
反序列化的关键方法是 AbstractHessianInput#readObject() ,我们主要关注其实现类 Hessian2Input 的 readObject() 方法:
|
|||
|
|
|
|||
|
|
|
|||
|
|
|
|||
|
|
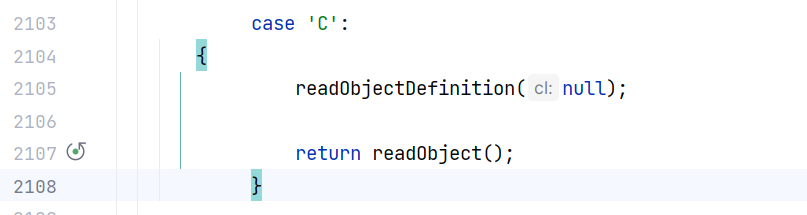
先从流中读取第一个字符,根据不同的首字符调用不同的处理逻辑。比如第一个字符是 C ,则进入对象的处理逻辑:
|
|||
|
|
|
|||
|
|
|
|||
|
|
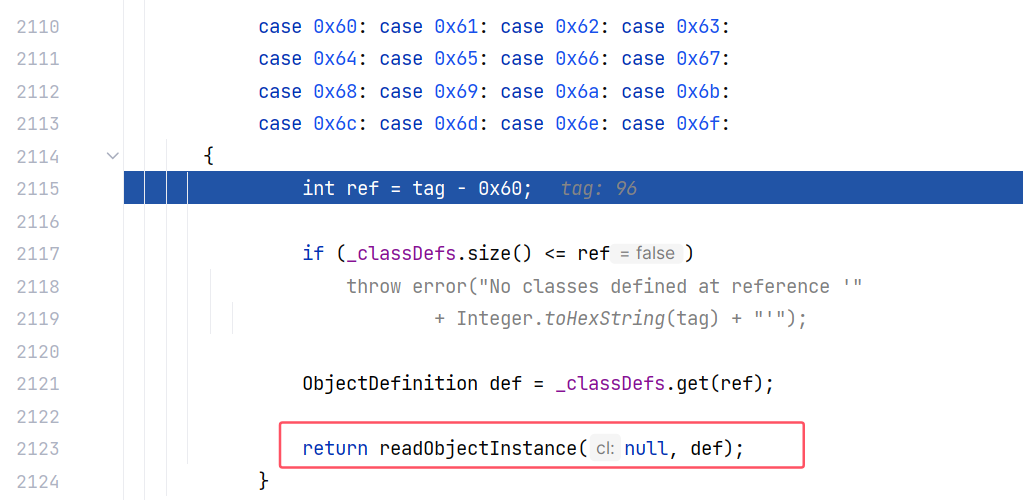
再一次进入 readObject ,根据运算得到 tag 为 96 ,进入下面的处理逻辑:
|
|||
|
|
|
|||
|
|
|
|||
|
|
|
|||
|
|
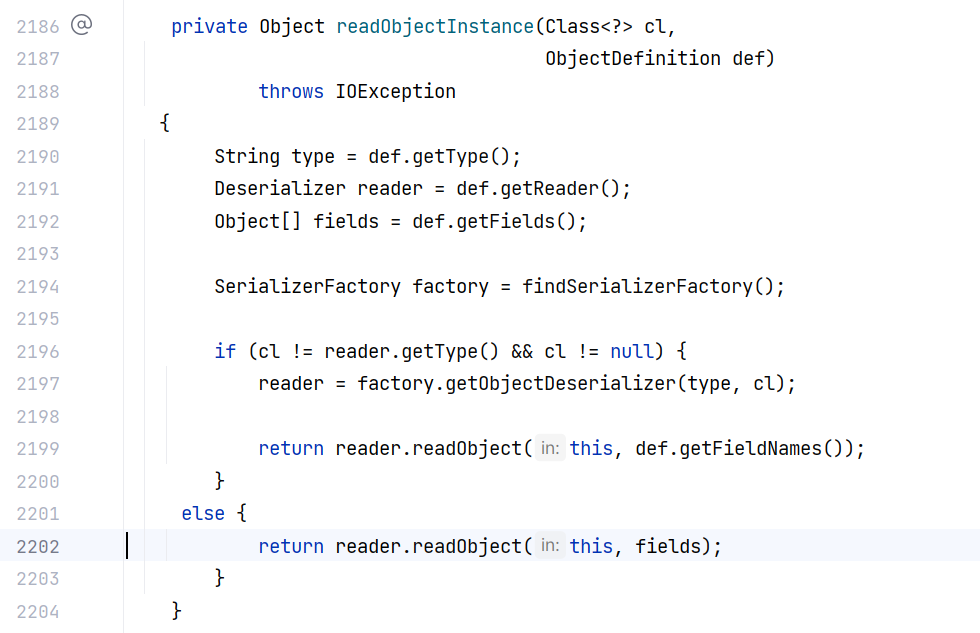
于是接着调用 readObjectInstance 方法,从流中获取类型和字段:
|
|||
|
|
|
|||
|
|
|
|||
|
|
|
|||
|
|
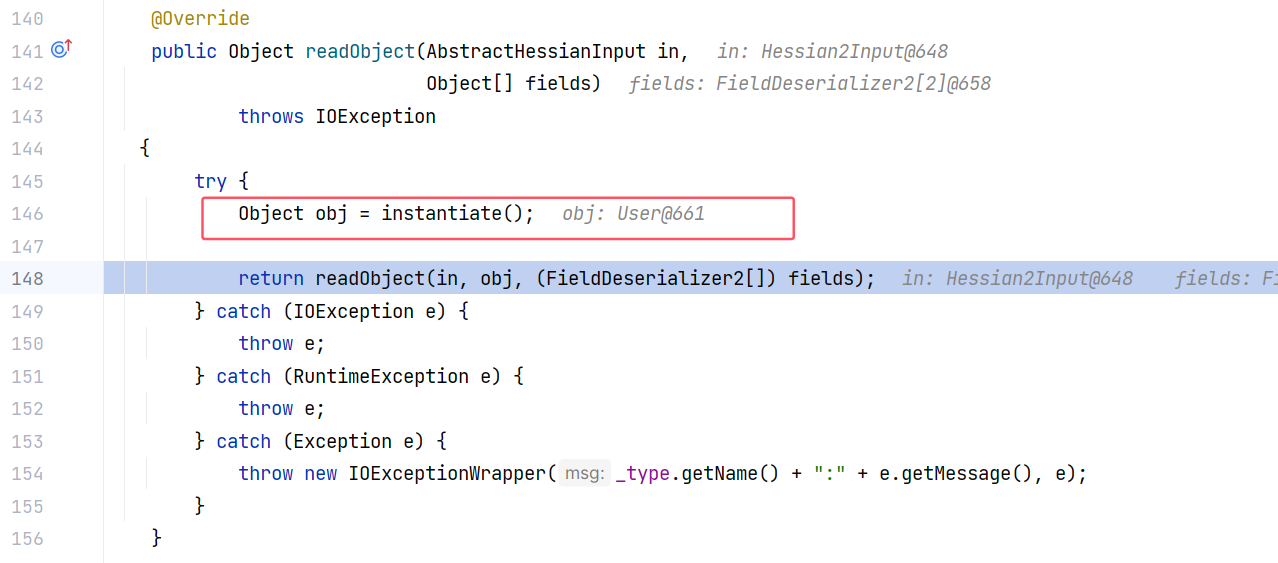
接着调用 readObject(AbstractHessianInput, Object\[\]) 方法,实例化该对象:
|
|||
|
|
|
|||
|
|
|
|||
|
|
|
|||
|
|
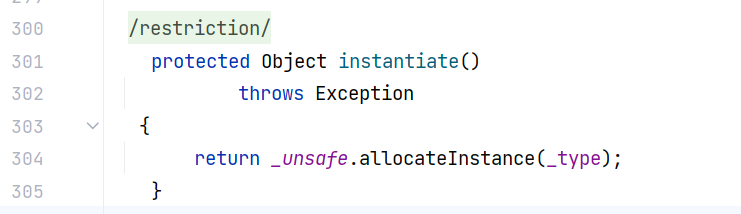
instantiate() 中使用 \_unsafe 直接创建类实例:
|
|||
|
|
|
|||
|
|
|
|||
|
|
|
|||
|
|
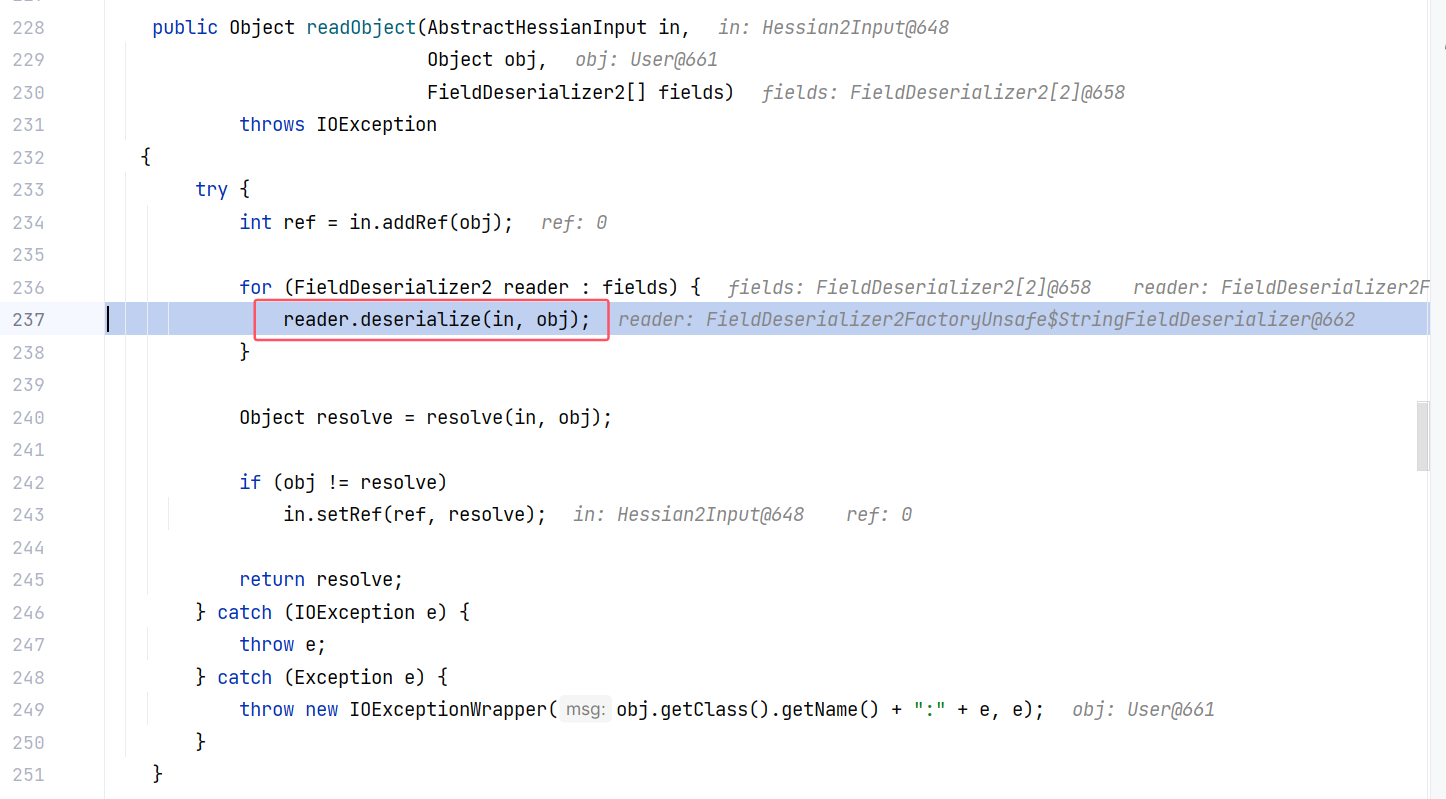
最后调用 readObject(AbstractHessianInput, Object, FieldDeserializer2\[\]) 反序列化字段值:
|
|||
|
|
|
|||
|
|
|
|||
|
|
|
|||
|
|
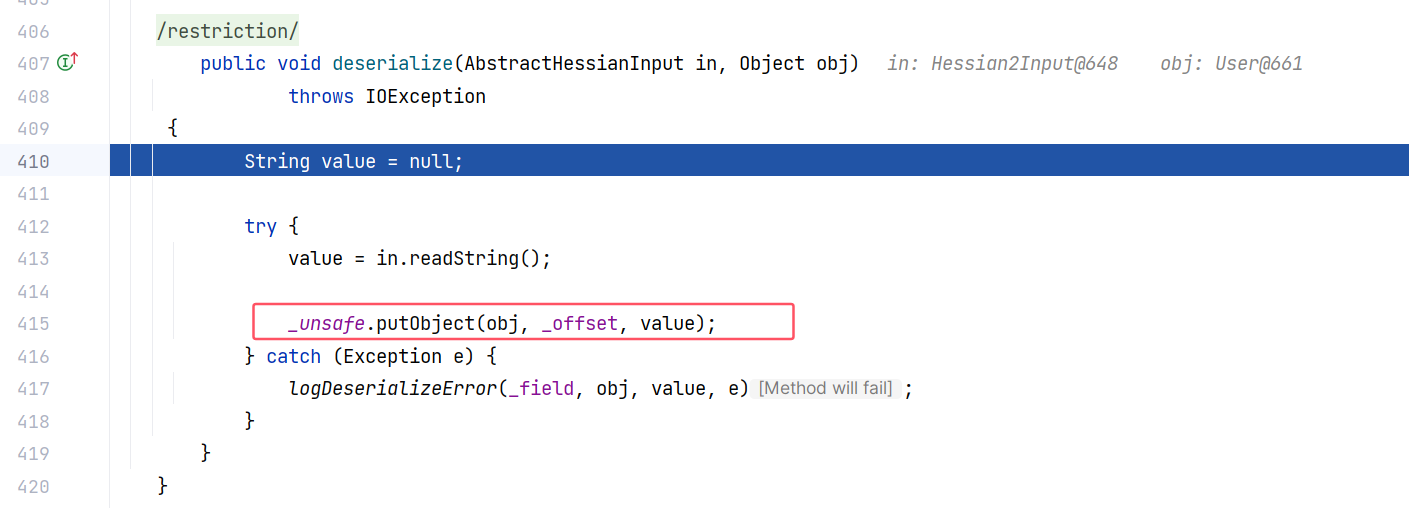
这里面实际上也是用 unsafe 写入字段值:
|
|||
|
|
|
|||
|
|
|
|||
|
|
|
|||
|
|
至此,Hessian2Input 的反序列化就完成了。
|
|||
|
|
|
|||
|
|
那么 HessianInput 跟它的差异在哪里呢?
|
|||
|
|
|
|||
|
|
前面提到,对于自定义对象,HessianOutput 会调用 writeMapBegin 写入 Map 标识符。所以反序列化时读到的第一个字符也是 Map 标识。实际上 HessianInput 是调用 readMap 来处理的,也就是说 hessian 1.0 把对象看作 Map 集合来序列化和反序列化:
|
|||
|
|
|
|||
|
|

|
|||
|
|
|
|||
|
|
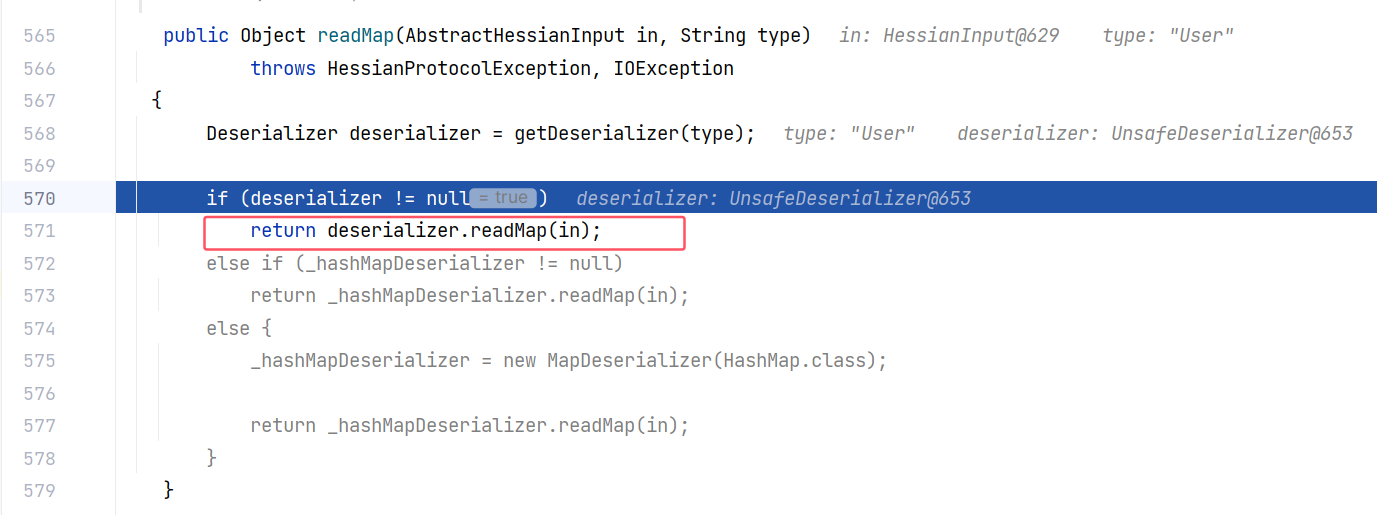
而 SerializerFactory#readMap(AbstractHessianInput, String) 也是直接调到 UnsafeDeserializer#readMap(AbstractHessianInput):
|
|||
|
|
|
|||
|
|
|
|||
|
|
|
|||
|
|
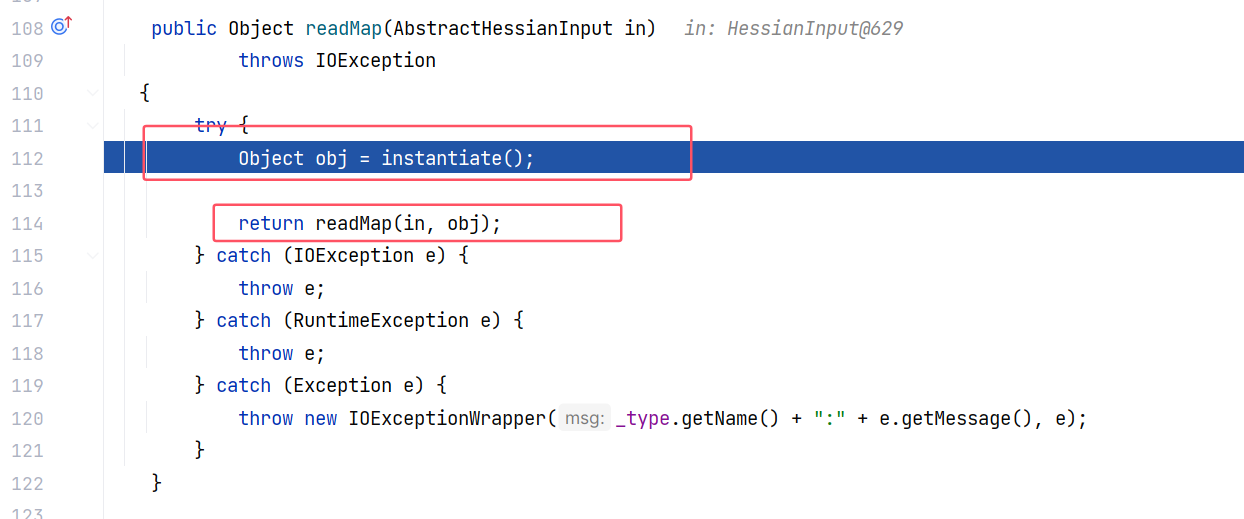
UnsafeDeserializer#readMap(AbstractHessianInput) 实际上跟前面相似,先用 unsafe 创建对象,再调用 readMap(AbstractHessianInput, Object) 通过 unsafe 注入字段值:
|
|||
|
|
|
|||
|
|
|
|||
|
|
|
|||
|
|
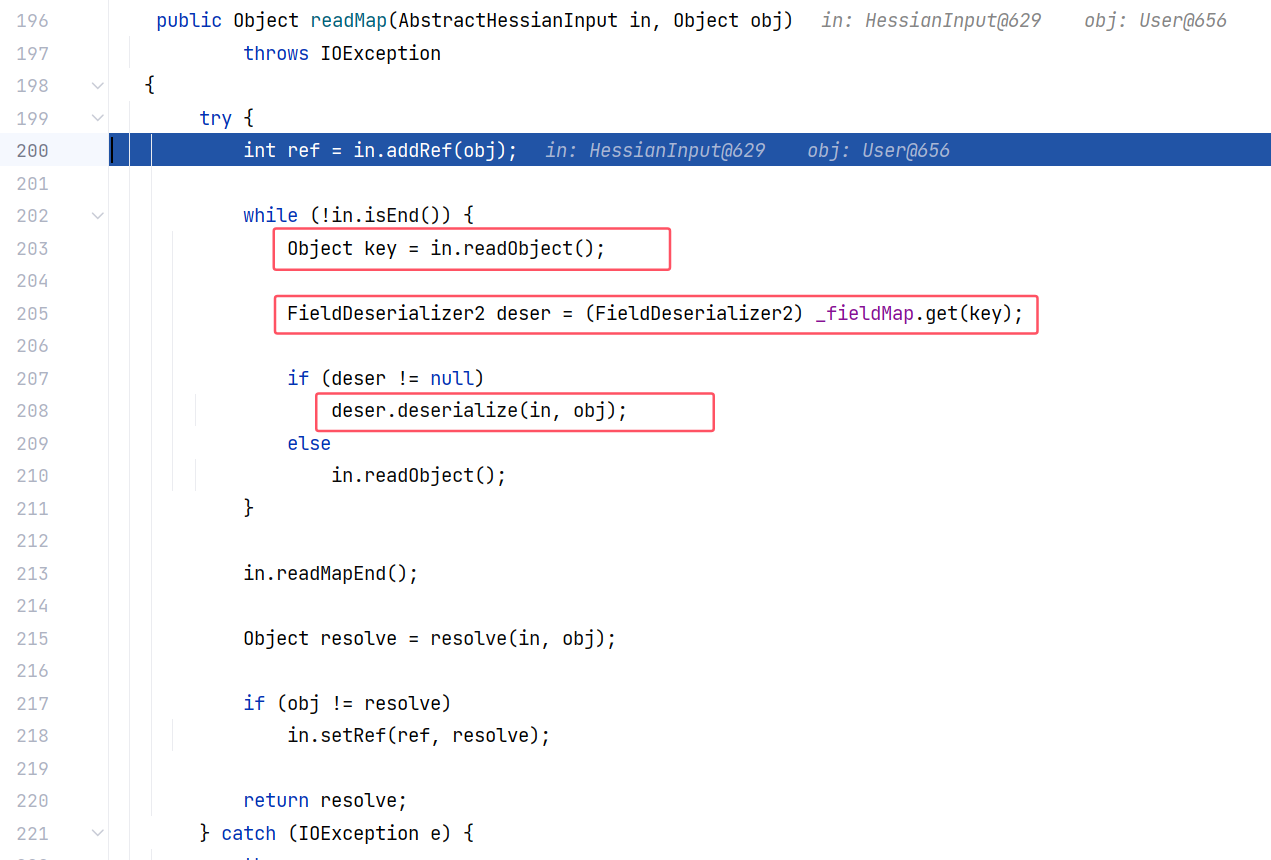
readMap(AbstractHessianInput, Object) 从流中获取 key(即字段名) ,从 \_fieldMap 中根据 key 获取 value(即字段值),然后通过 unsafe 将值注入:
|
|||
|
|
|
|||
|
|
|
|||
|
|
|
|||
|
|
这就是 hessain 1.0 的反序列化流程。
|
|||
|
|
|
|||
|
|
### 远程调用过程解析
|
|||
|
|
|
|||
|
|
就以 Servlet 方式为例,我们来分析一下客户端的远程调用逻辑,客户端代码如下:
|
|||
|
|
|
|||
|
|
```
|
|||
|
|
import com.caucho.hessian.client.HessianProxyFactory;
|
|||
|
|
|
|||
|
|
public class HessianClient {
|
|||
|
|
public static void main(String[] args) {
|
|||
|
|
String url = "http://localhost:8080/ServletBase_war/greeting"; // 替换为实际服务地址
|
|||
|
|
HessianProxyFactory factory = new HessianProxyFactory();
|
|||
|
|
try {
|
|||
|
|
GreetingService service = (GreetingService) factory.create(GreetingService.class, url);
|
|||
|
|
String result = service.sayHello("World");
|
|||
|
|
System.out.println(result); // 输出: Hello, World!
|
|||
|
|
} catch (Exception e) {
|
|||
|
|
e.printStackTrace();
|
|||
|
|
}
|
|||
|
|
}
|
|||
|
|
}
|
|||
|
|
```
|
|||
|
|
|
|||
|
|
这里关键的类是 HessianProxyFactory ,我们用它的 create 方法就获取到了远程对象。
|
|||
|
|
|
|||
|
|
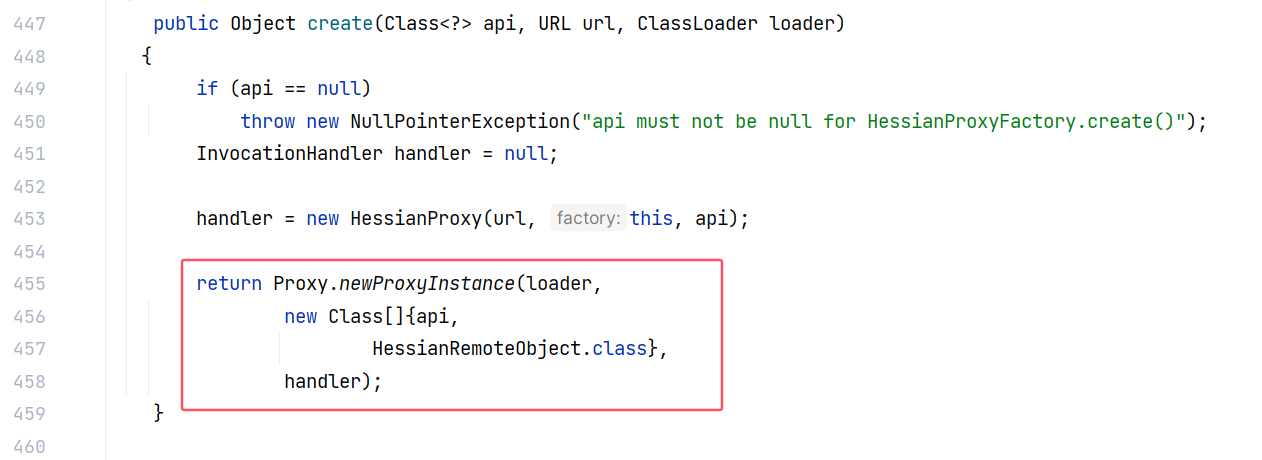
经过一系列重构方法的调用,最终是调用到 create(Class<?>, URL, ClassLoader) 方法,可以看到是利用 HessianProxy 创建了一个代理对象并返回:
|
|||
|
|
|
|||
|
|
|
|||
|
|
|
|||
|
|
那么这个代理对象的任意方法被调用都会触发 HessianProxy 的 invoke 方法。
|
|||
|
|
|
|||
|
|
在客户端代码中,接下来就会调用这个代理对象的方法,所以 invoke 方法一定会被触发,我们来关注一下 HessianProxy 的 invoke 方法,只需要关注几个重点就可以了。
|
|||
|
|
|
|||
|
|
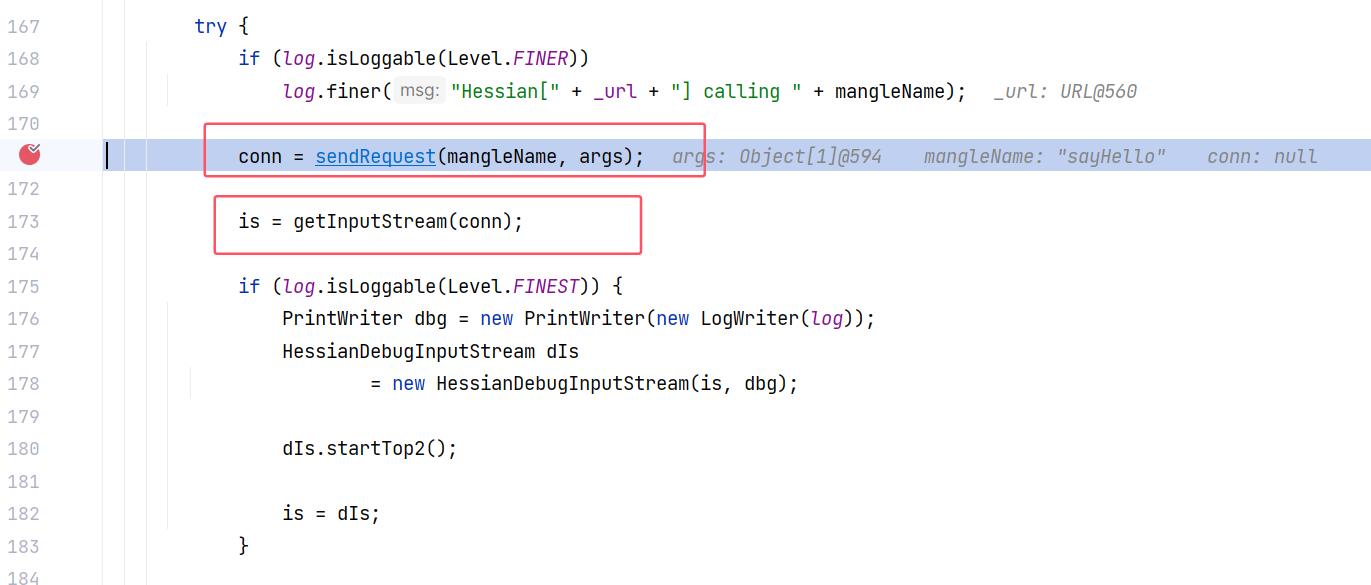
主要是调用 sendRequest 发送请求,然后接收响应并反序列化字节流:
|
|||
|
|
|
|||
|
|
|
|||
|
|
|
|||
|
|
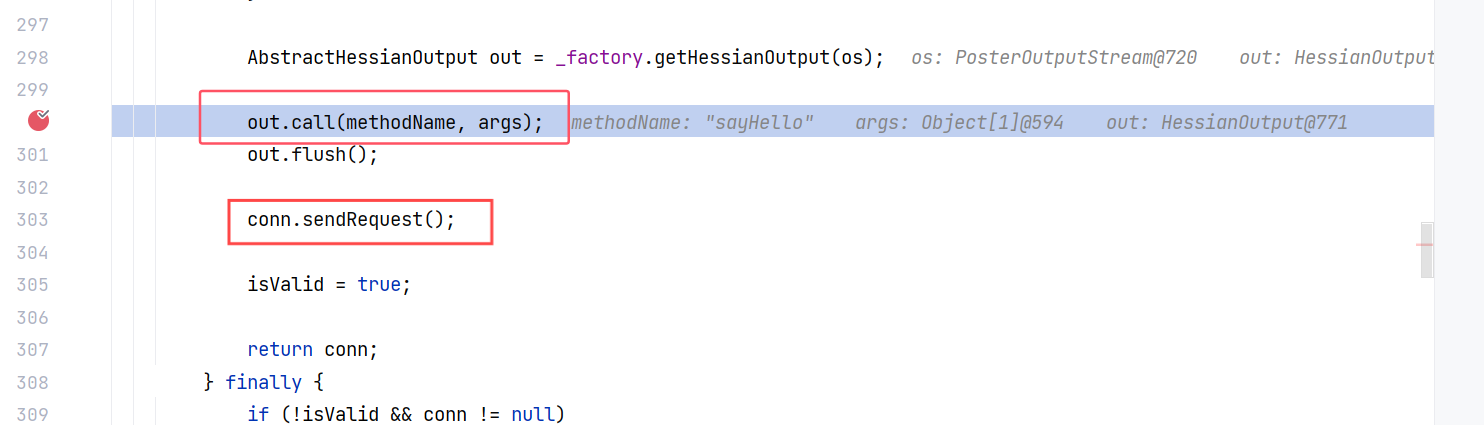
而 sendRequest 方法中主要是调用 call 方法将参数序列化写入字节流,最后调用 conn.sendRequest() 将请求发送至服务器:
|
|||
|
|
|
|||
|
|
|
|||
|
|
|
|||
|
|
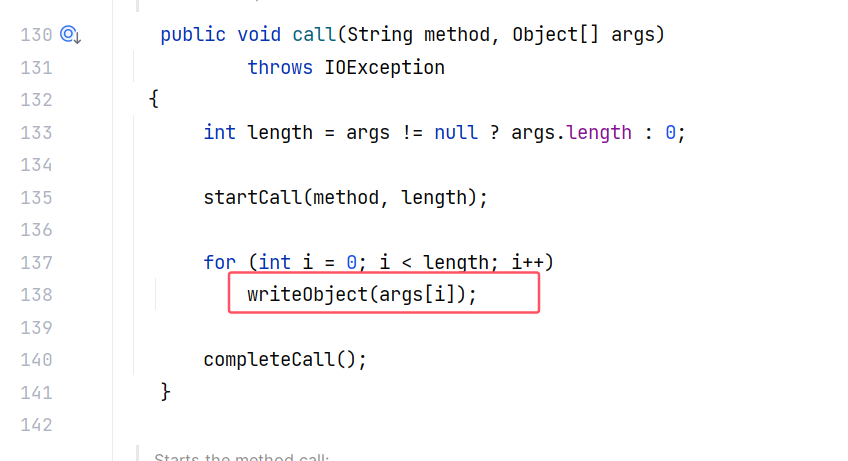
call 方法:
|
|||
|
|
|
|||
|
|
|
|||
|
|
|
|||
|
|
大致的过程就是这样。
|
|||
|
|
|
|||
|
|
服务端的处理逻辑就是调用 HessianServlet 的 service 方法来处理请求 ,前面已经分析过了。
|
|||
|
|
|
|||
|
|
### 调用栈总结
|
|||
|
|
|
|||
|
|
Servlet Hessian 客户端调用栈:
|
|||
|
|
|
|||
|
|
```
|
|||
|
|
-> HessianProxyFactory#create(Class, String)
|
|||
|
|
HessianProxyFactory#create(Class<?>, String, ClassLoader)
|
|||
|
|
HessianProxyFactory#create(Class<?>, URL, ClassLoader) # 返回代理对象
|
|||
|
|
-> HessianProxy#invoke(Object, Method, Object[]) # 建立连接,发送请求并接收响应
|
|||
|
|
HessianProxy#sendRequest(String, Object[])
|
|||
|
|
-> HessianOutput#call(String, Object[]) # 参数序列化
|
|||
|
|
-> HessianURLConnection#sendRequest() # 向服务端发送请求
|
|||
|
|
```
|
|||
|
|
|
|||
|
|
Servlet Hessian 服务端调用栈:
|
|||
|
|
|
|||
|
|
```
|
|||
|
|
HessianServlet#service(ServletRequest, ServletResponse)
|
|||
|
|
HessianServlet#invoke(InputStream, OutputStream, String, SerializerFactory)
|
|||
|
|
HessianSkeleton#invoke(InputStream, OutputStream, SerializerFactory)
|
|||
|
|
HessianSkeleton#invoke(Object, AbstractHessianInput, AbstractHessianOutput) # 参数反序列化,方法执行,结果返回
|
|||
|
|
```
|
|||
|
|
|
|||
|
|
Spring Hessian 服务端调用栈:
|
|||
|
|
|
|||
|
|
```
|
|||
|
|
HessianServiceExporter#handleRequest(HttpServletRequest, HttpServletResponse)
|
|||
|
|
HessianExporter#invoke(InputStream, OutputStream)
|
|||
|
|
HessianExporter#doInvoke(HessianSkeleton, InputStream, OutputStream)
|
|||
|
|
HessianSkeleton#invoke(AbstractHessianInput, AbstractHessianOutput)
|
|||
|
|
HessianSkeleton#invoke(Object, AbstractHessianInput, AbstractHessianOutput) # 参数反序列化,方法执行,结果返回
|
|||
|
|
```
|
|||
|
|
|
|||
|
|
Hessian2Output 序列化调用栈:
|
|||
|
|
|
|||
|
|
```
|
|||
|
|
Hessian2Output#writeObject(Object)
|
|||
|
|
UnsafeSerializer#writeObject(Object, AbstractHessianOutput)
|
|||
|
|
-> Hessian2Output#writeObjectBegin(String) # 开头写入对象标识符
|
|||
|
|
-> UnsafeSerializer#writeInstance(Object, AbstractHessianOutput) # 序列化字段值
|
|||
|
|
```
|
|||
|
|
|
|||
|
|
Hessian2Output 反序列化调用栈:
|
|||
|
|
|
|||
|
|
```
|
|||
|
|
Hessian2Input#readObject()
|
|||
|
|
Hessian2Input#readObject() # 再次调用
|
|||
|
|
Hessian2Input#readObjectInstance(Class<?>, ObjectDefinition)
|
|||
|
|
UnsafeDeserializer#readObject(AbstractHessianInput, Object[])
|
|||
|
|
-> UnsafeDeserializer#instantiate() # 使用 unsafe 创建类实例
|
|||
|
|
-> UnsafeDeserializer#readObject(AbstractHessianInput, Object, FieldDeserializer2[])
|
|||
|
|
FieldDeserializer2FactoryUnsafe$XxxFieldDeserializer#deserialize(AbstractHessianInput, Object) # 使用 unsafe 写入字段值
|
|||
|
|
```
|
|||
|
|
|
|||
|
|
## 参考文章
|
|||
|
|
|
|||
|
|
[su18 - Hessian 反序列化漏洞](https://www.javasec.org/java-vuls/Hessian.html)
|
|||
|
|
|
|||
|
|
[Tomcat - JNDI 资源使用方法](https://tomcat.apache.org/tomcat-9.0-doc/jndi-resources-howto.html#web.xml_configuration)
|